Blog
Welcome to my blog filled with lots of useful advice, information and news about the world of coloured pencils and drawing animals.
The All New Derwent Drawing Pencils, What Do I think?
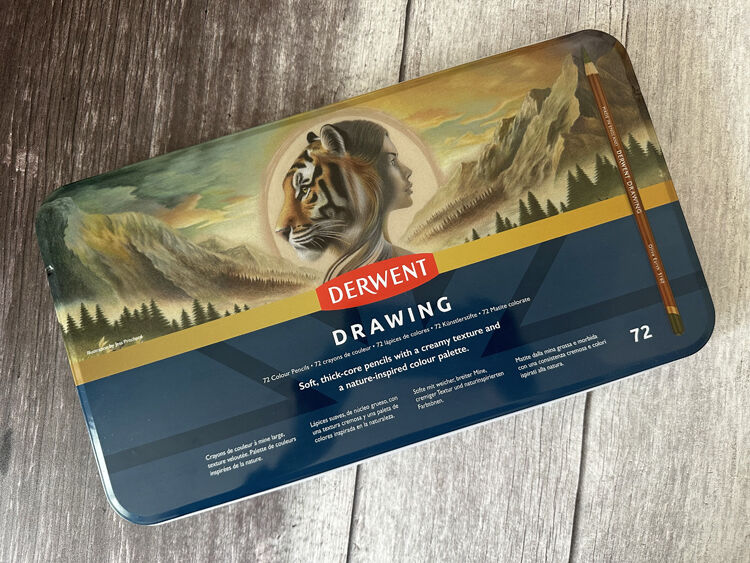
When I was approached by Derwent asking if I would be interested in receiving a gift to try out with a discount code for my followers it was an absolute no brainer to say yes. I mean who doesn’t love art supplies! I have to be honest and say I was absolutely thrilled when I found out it was a set of the 72 Drawing pencils. Like most coloured pencil artists I have an obsession with collecting them and my philosophy is you can never have too many pencils, but of course they need to be the right pencils! With that in mind I was itching to bust open that tin and not only see what colours they had come up with but how they felt to draw with. You probably have a bunch of questions about them, just like I did, so let’s see if I can answer them for you.
Isn’t there already Derwent drawing pencils available?
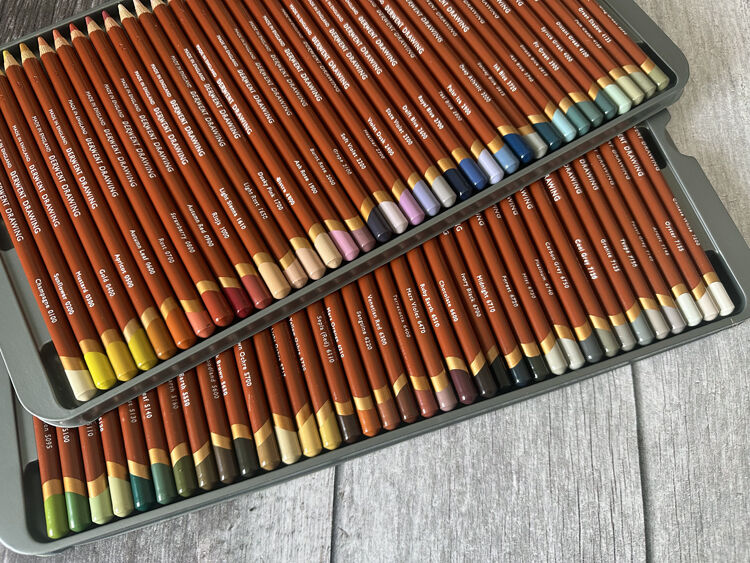
You may have already heard of the Derwent Drawing pencil range and be thinking that they’re nothing new and to an extent you would be correct. They originally released six earthy colours all the way back in 1986 which expanded to a 24 colour set. However, as of the 1st October 2025 Derwent have extended the range to include a total of 72 colours, that’s 48 new nature-inspired pencils which I know many people have been waiting a long time for. I can honestly say whilst I adore my Derwent Lightfast pencils, I haven’t particularly used the drawing range before, simply because I didn’t like the idea of being so limited with the colours.
What is the new colour palette like?
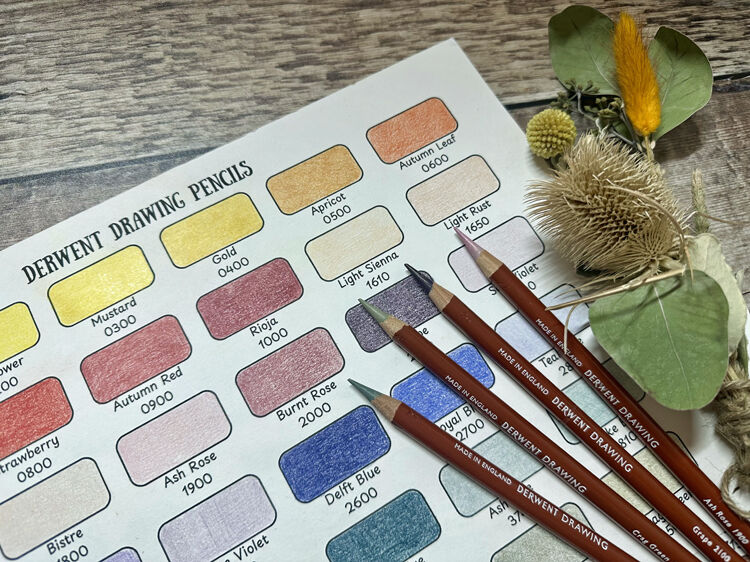
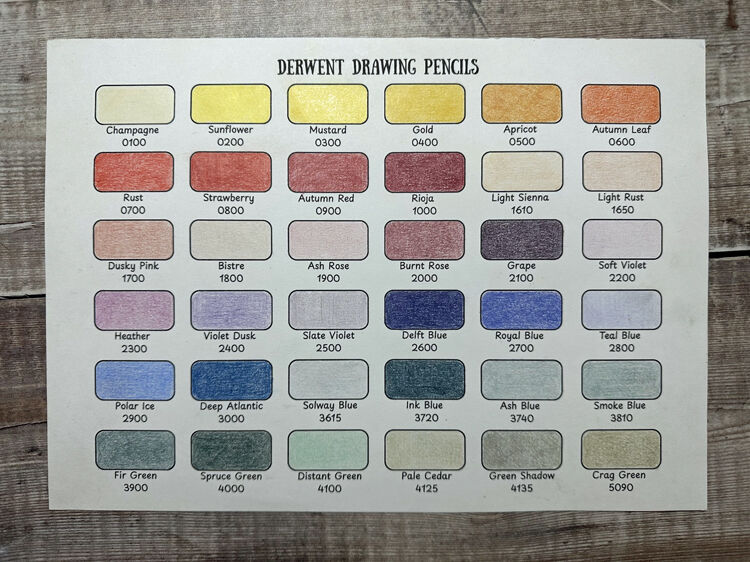
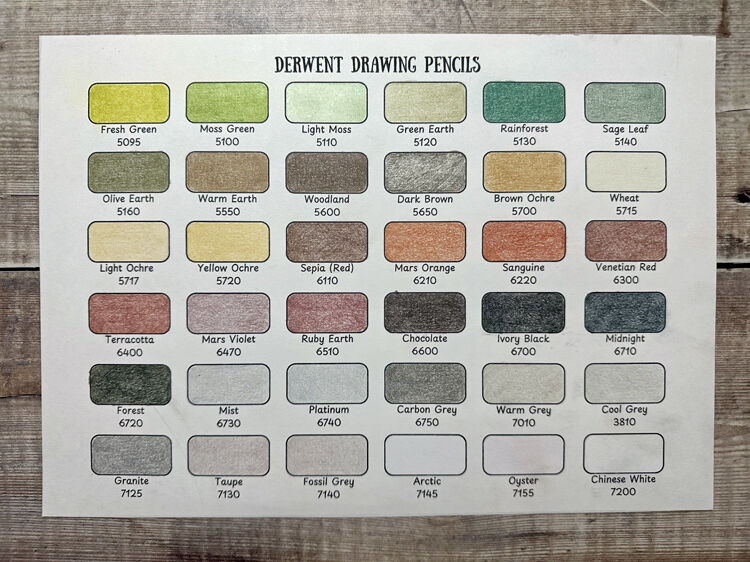
Derwent have given these pencils a whole fresh new look. They have created a nature-inspired palette that are highly pigmented which would be ideal for using to create a variety of subjects. I predominantly draw animals and wildlife with some landscape and these pencils make a perfect companion to add to my repertoire of pencils. They would also be great for portraiture and a number of other subjects. The 48 new colours definitely give a more versatile palette with some yellows, greens and earthy colours as well as some pretty blues and greens. Nature is definitely at the forefront of the creation of these pencils and very much reminds me of the Lake District, which happens to be my favourite place in the world and also the roots of Derwent. Whilst the 72 pencil set is filled with colour it is created around the original muted set.
The first thing I did when receiving these pencils is create myself colour charts, one for each tin.
What are the pencils actually like to draw with?
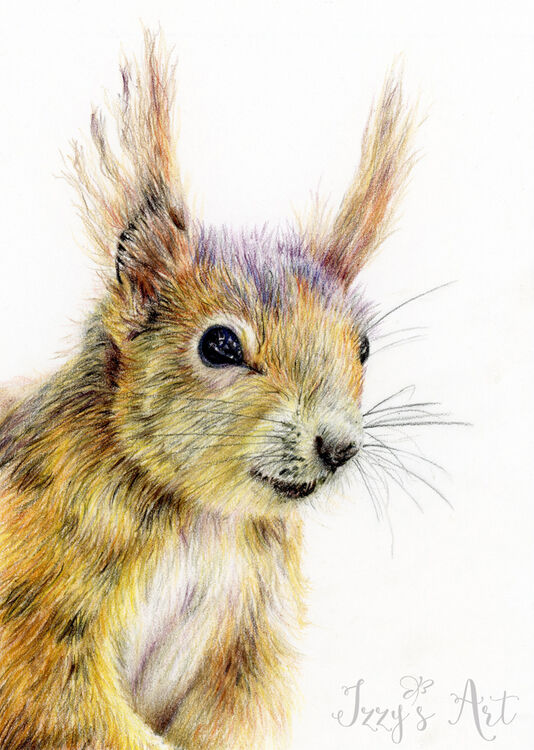
If you are completely new to the Drawing range, then you may be wandering what these pencils are actually like in terms of their softness and actual structure. The thing that struck me the most when I tested them out was how soft and creamy the core of these pencils actually is. Whilst I’ve not tested every single pencil out in the world, I’ve used quite a few over the years and I think these are one of the softest pencils I’ve drawn with. I personally love using soft pencils, particularly for drawing fur and textures and this drawing range is beautifully creamy making them ideal for blending and layering colours with ease. If you are someone who prefers a harder lead then these might not be the pencils for you, although I would always encourage you to test pencils out before making any decisions. If you prefer a harder lead then the lightfast range might be more suitable for your style. The other thing what I really noticed was the extra wide 5mm core in an 8mm round barrel, which I’ve found particularly useful for creating broader strokes and covering large areas quickly. Something I personally find takes more time and patience with a smaller harder core. You can see here my first attempt of a drawing with them and the autumn colours in the range were ideal for creating a red squirrel. I found it much easier than usual at covering the paper and getting down those soft fur layers with a beautiful opaque coverage. I particularly liked the effect using a light pressure, creating a velvety soft finish.
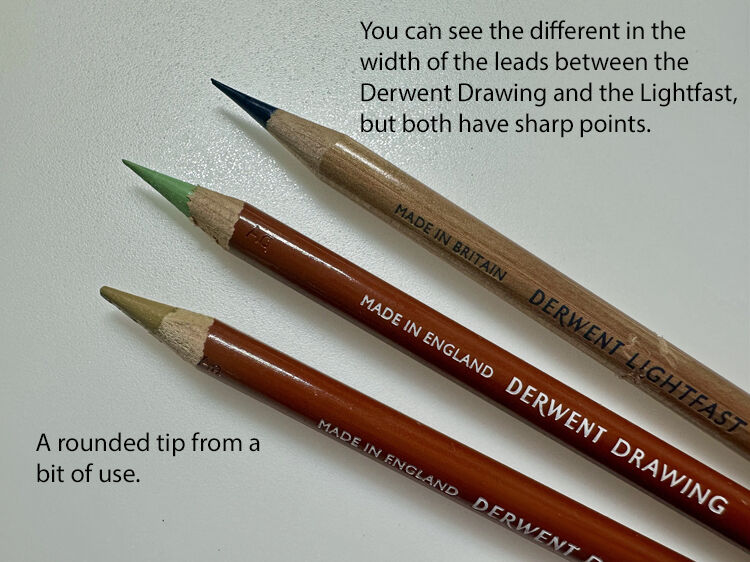
Can you create a sharp point with such a soft lead?
For some people this might not be a question they have thought of, but I’m someone who loves having a super long extra sharp tip on my coloured pencils. When I first sharpened them I found my usual sharpener wasn’t the best for these pencils and being soft it was making the core crumble a little on some of pencils I had. I decided to try some different sharpeners and found I got on much better and I was able to create nice sharp points as you can see. What I came to realise through using them though was that being so soft, if I pressed too firmly that sharpness soon disappeared. You might think this is a problem, however the more I used them, the more I became accustomed to how to get the best out of them, and the slightly softer points I could actually use to my advantage to create a painterly quality in my work. I found however that I could make the tips sharp enough to create some details in my work, such as the eyes but in the future I would probably incorporate them with a few pencils from the Lightfast range, which whilst beautifully creamy hold a sharper tip. My first drawing of the squirrel was deliberately drawn using just the Drawing set to see what I could do with them, but in reality I always mix different pencils together within a drawing so I will be interested to see how they combine with other pencils in the future.
What’s the lightfast rating like?
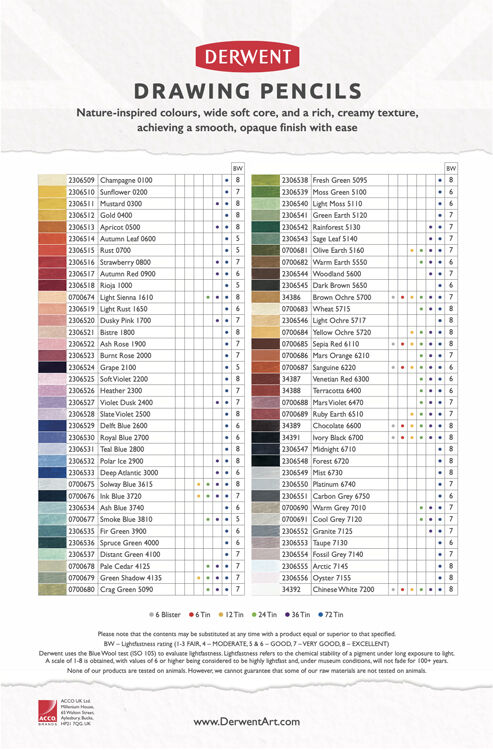
If like me you prefer to use pencils that have a high lightfast rating then this is one of the first questions I always ask. At the end of the day I want the work I have spent hours on to create to last a really long time, especially when I’m selling a piece. I was so happy to find out this new range is indeed lightfast, ensuring that your artwork will retain its vibrancy for a long time. I wanted to find out more specifics on just how lightfast each of the individual pencils actually is, so I reached out to Derwent and they sent me this lightfast chart. According to their information, "Derwent have used the Blue Wool test (ISO 105) to evaluate lightfastness. Lightfastness refers to the chemical stability of a pigment under long exposure to light. A scale of 1-8 is obtained, with values of 6 or higher being considered to be highly lightfast and under museum conditions, will not fade for 100+ years." With that in mind I can see that only 5 of the pencils aren't considered to be highly lightfast with the majority being very good or excellent. Would I like all of them to have the higher ratings, yes absolutely but the 5 that aren't are still considered good so I can live with that.
How are they going to be available to buy?
I’m sure some of you are wandering if you can just purchase the new 48 colours. At the time of writing this, I don’t think they will be released as a separate set which I’m sure some of you might be disappointed to hear. Although if you are an avid pencil lover then I’m sure you will make use of those extra pencils! It is my understanding that you will be able to buy the pencils as a full set of 72 pencils, or a tin of 36 pencils, or the previous 24, 12 or 6 pencils, as well as individual colours. I will update this when I find out more, along with the price once they are available sale on the 1st October 2025.
Would I recommend them?
When it comes to choosing which colour pencils to buy and use it really is a very personal thing and what is right for one person might not be for another. Personally I’m absolutely in love with this new range and I can hand on heart say I would recommend them to anyone who loves a soft core pencil. If I hadn’t been gifted a set I would be purchasing the full set as soon as they are available and I will definitely be replacing colours as and when they run out with individual pencils. I think they will fit very nicely into my already large pencil collection, filling a gap of softer core pencils that cover the paper quickly and easily all whilst providing a good variety of colours. Some of which are the same as the Lightfast range such as the ‘heather’ ‘mustard’ ‘gold’ and ‘forest’. If I counted correctly I believe that 26 (including white) are actually the same colour, but I love the fact that I have softer versions of those colours. The only colour I really wish they had included from the Lightfast range is the ‘Nightshade’ which is my all time favourite pencil, but at least I can still use that with this new set. If comparing the colours to the Lightfast range, I think they have brought out some amazing shades of blues and greens that are missing as it were from that set.

Overall I would say you should definitely give them a try, even if you buy a few to test them out first. If you are itching to get your hands on some then they are available from the 1st October 2025 and you can get 20% off on the Derwent website using code DRAW-IB . If you want to see what else I create with them then hop over to my Instagram or Facebook page and follow along. You can also let me know then what you think of these new pencils, I’d love to hear your thoughts!
Isn’t there already Derwent drawing pencils available?
You may have already heard of the Derwent Drawing pencil range and be thinking that they’re nothing new and to an extent you would be correct. They originally released six earthy colours all the way back in 1986 which expanded to a 24 colour set. However, as of the 1st October 2025 Derwent have extended the range to include a total of 72 colours, that’s 48 new nature-inspired pencils which I know many people have been waiting a long time for. I can honestly say whilst I adore my Derwent Lightfast pencils, I haven’t particularly used the drawing range before, simply because I didn’t like the idea of being so limited with the colours.
What is the new colour palette like?
Derwent have given these pencils a whole fresh new look. They have created a nature-inspired palette that are highly pigmented which would be ideal for using to create a variety of subjects. I predominantly draw animals and wildlife with some landscape and these pencils make a perfect companion to add to my repertoire of pencils. They would also be great for portraiture and a number of other subjects. The 48 new colours definitely give a more versatile palette with some yellows, greens and earthy colours as well as some pretty blues and greens. Nature is definitely at the forefront of the creation of these pencils and very much reminds me of the Lake District, which happens to be my favourite place in the world and also the roots of Derwent. Whilst the 72 pencil set is filled with colour it is created around the original muted set.
The first thing I did when receiving these pencils is create myself colour charts, one for each tin.
What are the pencils actually like to draw with?
If you are completely new to the Drawing range, then you may be wandering what these pencils are actually like in terms of their softness and actual structure. The thing that struck me the most when I tested them out was how soft and creamy the core of these pencils actually is. Whilst I’ve not tested every single pencil out in the world, I’ve used quite a few over the years and I think these are one of the softest pencils I’ve drawn with. I personally love using soft pencils, particularly for drawing fur and textures and this drawing range is beautifully creamy making them ideal for blending and layering colours with ease. If you are someone who prefers a harder lead then these might not be the pencils for you, although I would always encourage you to test pencils out before making any decisions. If you prefer a harder lead then the lightfast range might be more suitable for your style. The other thing what I really noticed was the extra wide 5mm core in an 8mm round barrel, which I’ve found particularly useful for creating broader strokes and covering large areas quickly. Something I personally find takes more time and patience with a smaller harder core. You can see here my first attempt of a drawing with them and the autumn colours in the range were ideal for creating a red squirrel. I found it much easier than usual at covering the paper and getting down those soft fur layers with a beautiful opaque coverage. I particularly liked the effect using a light pressure, creating a velvety soft finish.
Can you create a sharp point with such a soft lead?
For some people this might not be a question they have thought of, but I’m someone who loves having a super long extra sharp tip on my coloured pencils. When I first sharpened them I found my usual sharpener wasn’t the best for these pencils and being soft it was making the core crumble a little on some of pencils I had. I decided to try some different sharpeners and found I got on much better and I was able to create nice sharp points as you can see. What I came to realise through using them though was that being so soft, if I pressed too firmly that sharpness soon disappeared. You might think this is a problem, however the more I used them, the more I became accustomed to how to get the best out of them, and the slightly softer points I could actually use to my advantage to create a painterly quality in my work. I found however that I could make the tips sharp enough to create some details in my work, such as the eyes but in the future I would probably incorporate them with a few pencils from the Lightfast range, which whilst beautifully creamy hold a sharper tip. My first drawing of the squirrel was deliberately drawn using just the Drawing set to see what I could do with them, but in reality I always mix different pencils together within a drawing so I will be interested to see how they combine with other pencils in the future.
What’s the lightfast rating like?
If like me you prefer to use pencils that have a high lightfast rating then this is one of the first questions I always ask. At the end of the day I want the work I have spent hours on to create to last a really long time, especially when I’m selling a piece. I was so happy to find out this new range is indeed lightfast, ensuring that your artwork will retain its vibrancy for a long time. I wanted to find out more specifics on just how lightfast each of the individual pencils actually is, so I reached out to Derwent and they sent me this lightfast chart. According to their information, "Derwent have used the Blue Wool test (ISO 105) to evaluate lightfastness. Lightfastness refers to the chemical stability of a pigment under long exposure to light. A scale of 1-8 is obtained, with values of 6 or higher being considered to be highly lightfast and under museum conditions, will not fade for 100+ years." With that in mind I can see that only 5 of the pencils aren't considered to be highly lightfast with the majority being very good or excellent. Would I like all of them to have the higher ratings, yes absolutely but the 5 that aren't are still considered good so I can live with that.
How are they going to be available to buy?
I’m sure some of you are wandering if you can just purchase the new 48 colours. At the time of writing this, I don’t think they will be released as a separate set which I’m sure some of you might be disappointed to hear. Although if you are an avid pencil lover then I’m sure you will make use of those extra pencils! It is my understanding that you will be able to buy the pencils as a full set of 72 pencils, or a tin of 36 pencils, or the previous 24, 12 or 6 pencils, as well as individual colours. I will update this when I find out more, along with the price once they are available sale on the 1st October 2025.
Would I recommend them?
When it comes to choosing which colour pencils to buy and use it really is a very personal thing and what is right for one person might not be for another. Personally I’m absolutely in love with this new range and I can hand on heart say I would recommend them to anyone who loves a soft core pencil. If I hadn’t been gifted a set I would be purchasing the full set as soon as they are available and I will definitely be replacing colours as and when they run out with individual pencils. I think they will fit very nicely into my already large pencil collection, filling a gap of softer core pencils that cover the paper quickly and easily all whilst providing a good variety of colours. Some of which are the same as the Lightfast range such as the ‘heather’ ‘mustard’ ‘gold’ and ‘forest’. If I counted correctly I believe that 26 (including white) are actually the same colour, but I love the fact that I have softer versions of those colours. The only colour I really wish they had included from the Lightfast range is the ‘Nightshade’ which is my all time favourite pencil, but at least I can still use that with this new set. If comparing the colours to the Lightfast range, I think they have brought out some amazing shades of blues and greens that are missing as it were from that set.
Overall I would say you should definitely give them a try, even if you buy a few to test them out first. If you are itching to get your hands on some then they are available from the 1st October 2025 and you can get 20% off on the Derwent website using code DRAW-IB . If you want to see what else I create with them then hop over to my Instagram or Facebook page and follow along. You can also let me know then what you think of these new pencils, I’d love to hear your thoughts!
Is The Derwent Pencil Museum Worth A Visit? Read My Review To Find Out What I Think.....
I was lucky enough last week during half term to visit my favourite part of England, the Lake District. It’s somewhere I used to go every year as a child and I’ve been wanting to visit again with my own children. It has to be one of the most beautiful landscapes, and there is so much to see and explore but one of the places I’ve never visited before is the Derwent Pencil museum in Keswick. Now giving that colour pencils have pretty much become my life since becoming a full time artist (other than my family!) it has been high on my list of places to visit. So I don’t think my family were the least bit surprised when I insisted that the one thing we had to do whilst there was visit it!

Now I’m sure there are plenty of you out there who have either never thought of going or are unable to, so I decided that I would share with you what my visit was like and what myself and my family thought about it.

When we arrived the first thing my seven year old twins spotted was the van parked outside the front entrance which they were keen to take a look at. Before actually going into the museum though, we took a detour to the toilets which you can find the entrance to from the front of the building before going in to pay. Very handy to have quick easy access to toilets when travelling with children. To pay for your tickets, you just head straight into the shop. Even though it was half term holidays, we didn’t have to wait long to be served by a very friendly lady, who took the time to engage with the children. One of the features that we all loved was the fact that we were each given a Derwent HB pencil to keep and this was actually our ticket to enter the museum itself. Such a novel idea and my twins were delighted with their complementary pencils and took them home and have been using them since.
We were also all given our own quizzes to do and I liked how we were each lent a clipboard to lean on to write our answers as it can be so frustrating, especially for children, to try and write on paper when there is no flat surface to do so. The other thing that I particularly liked, was how there were different levels of questions to answer depending upon how old you are. There was very simple colouring and tracing over, look and find activities for the youngest children, for older children there was some simple questions to find the answers of and then find the answers in a word search and the adults were presented with 20 more challenging questions. Sometimes at museums and exhibitions, I find my children don’t always complete the activities as they are not engaging enough, or too challenging, we’ve forgotten to bring pencils etc, but they loved finding the answers in the museum and writing them down. This also encouraged them to be more engaged and read some of the information boards, particularly the labels and bold writing and it also taught them a little about pencils. From the adults point of view, my husband and I really enjoyed the quiz we were given and it definitely got me reading all of the information boards. I will hold my hands up and say I tend to be someone who skims all the writing and just look at the objects in museums, but I wanted to get all my questions right with the prospect of a prize at the end! I’m so glad I did, as I found it all really fascinating. Now I’m sure some of that is because I’m so obsessed with pencils, but my husband who is in no way arty and only came with us because he knew how much I wanted to go, found it really interesting too!

Once we had paid our entrance fee (a family of 4 cost £19.50 at the time of writing this) we went through a tunnel which was like walking through the mines. I thought it was a nice touch and a little more interesting than just walking through a door and more importantly the children liked it and they were excited to start exploring.

Once through into the museum, you will find that the exhibition is just in one room. Now you might think it’s not that big but actually they have laid it out really well and fit a lot of information and displays in there for you to see. We found at the first display board there was a few people all trying tor read it at the same time, but then people spread out and even though it was holiday time, we didn’t feel it was too crowded even with quite a few people there.
As well as the information boards on the walls, there is a tv screen where you can choose from a few different videos. I wanted to watch the one of how the pencils are made in the factory. The video itself I found absolutely fascinating. What I would say is it was a shame that they didn’t have any subtitles and with the noise of the other visitors, I couldn’t hear what they were saying. If they could add subtitles this would seriously improve the videos and also make it more inclusive for deaf people. I wish I could have actually seen the pencils being made in the factory in person, but they don’t make them there anymore as they moved premises.

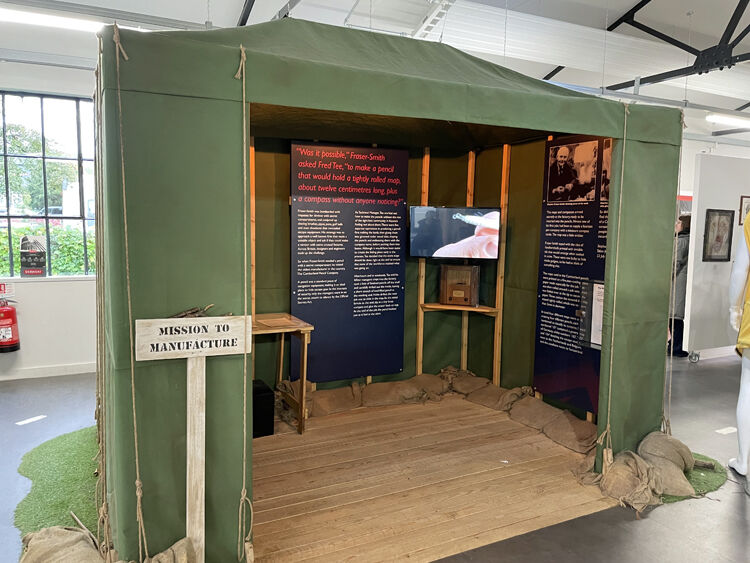
The aspects that I found most interesting myself, were seeing the old Derwent pencils and packaging and how they have changed over the years. I even spotted some tins from the 1980s and 90s that I still have! Also learning more about graphite and the mining of it, how pencils were made and how they’re made now, and in particular about a man called Charles Fraser-Smith and how he used the Derwent pencils to supply equipment and gadgets to secret agents or prisoners of war trying to escape during the Second World War.

From a children’s point of view, my twins loved the fact that there was a colouring area and being near Halloween there were different Halloween pictures they could colour. I loved how the pencils provided on the tables were a variety from the Derwent ranges and not just from the cheaper end. My children particularly loved being able to use the Lightfast range as whilst I let them use most of my hundreds of pencils at home, I’ve not let them loose with those ones yet! I think its great to give the children the opportunity to see what decent pencils are actually like as most children I’m sure will only ever get the chance to use cheap children’s pencils with very little pigment in them. The only improvement would have been being able to sharpen the pencils as they had all gone rather blunt which my children found a little frustrating.

Another highlight for them was the pumpkin wall. My little boy in particular loved the display of children’s pumpkins and was very excited to colour his own one to have added to the wall. When we had finished in the museum and handed it in to one of the ladies in the shop, she made him feel very special. I loved how she asked him if he would like it to go on display and then took the time to cut it out there and then and asked if he would like to go with her to stick it onto the display. She could have quite easily said she would put it on later but that small act meant my little man came out beaming with pride.

They were also really interested in all of the different pencil sharpeners that had been donated to the museum and they were asked to design their own sharpeners on their quiz sheet, which the lady in the shop asked them if they could explain to her making them feel like they had done amazing work.
When we had finished in the museum we took our sheets and clipboards back to the ladies in the shop, who took the time to mark them and talk to the children about what they had done. They were thrilled to receive colour pencils for their efforts and these came in very handy for colouring in the books they purchased in the shop in the car on the way home!
If you are a pencil lover, the shop itself is like a kid visiting a sweet shop! You can find single pencils, tins of pencils, a range of pads of paper, information books, children’s colouring books, notecards, water bottles, the list goes on. My children were very keen to spend a bit of their holiday money choosing a drawing book each. My daughter choose a Christmas activity book and my little boy chose learn how to draw dragons. It was nice for them to take the time to look at the books in person rather than choose something from the internet.
There is also a cafe right next to the shop which looked lovely, but we didn't visit on this particular occasion.
Overall we all throughly enjoyed our visit to the pencil museum and a big thank you to the two ladies working there who made our experience even more enjoyable. Even my husband who didn’t think he would like it really did and came away feeling like it was a few hours very well spent. I thought it would take about an hour, but in total we ended up being there for over 2 hours so I’m glad I purchased 3 hours for the car parking which cost me £3. You can park right outside the museum, but note it is not run by the museum itself and you have to pay for parking, although I found it quite reasonable compared to many car parks in the Lakes.
I would personally recommend visiting here if you are in the Lake District as it’s a fun and informative way to spend an hour or two. As we weren’t staying in Keswick ourselves, we tied it in with taking a picnic and visiting Derwent Lake. If you plan on visiting yourself, check out their website Derwent Pencil Museum for up to date prices and opening hours as in the winter months, they are closed on Mondays and Tuesdays.

Derwent Pencil Museum Entrance
Now I’m sure there are plenty of you out there who have either never thought of going or are unable to, so I decided that I would share with you what my visit was like and what myself and my family thought about it.
Derwent Pencil Museum Van
When we arrived the first thing my seven year old twins spotted was the van parked outside the front entrance which they were keen to take a look at. Before actually going into the museum though, we took a detour to the toilets which you can find the entrance to from the front of the building before going in to pay. Very handy to have quick easy access to toilets when travelling with children. To pay for your tickets, you just head straight into the shop. Even though it was half term holidays, we didn’t have to wait long to be served by a very friendly lady, who took the time to engage with the children. One of the features that we all loved was the fact that we were each given a Derwent HB pencil to keep and this was actually our ticket to enter the museum itself. Such a novel idea and my twins were delighted with their complementary pencils and took them home and have been using them since.
We were also all given our own quizzes to do and I liked how we were each lent a clipboard to lean on to write our answers as it can be so frustrating, especially for children, to try and write on paper when there is no flat surface to do so. The other thing that I particularly liked, was how there were different levels of questions to answer depending upon how old you are. There was very simple colouring and tracing over, look and find activities for the youngest children, for older children there was some simple questions to find the answers of and then find the answers in a word search and the adults were presented with 20 more challenging questions. Sometimes at museums and exhibitions, I find my children don’t always complete the activities as they are not engaging enough, or too challenging, we’ve forgotten to bring pencils etc, but they loved finding the answers in the museum and writing them down. This also encouraged them to be more engaged and read some of the information boards, particularly the labels and bold writing and it also taught them a little about pencils. From the adults point of view, my husband and I really enjoyed the quiz we were given and it definitely got me reading all of the information boards. I will hold my hands up and say I tend to be someone who skims all the writing and just look at the objects in museums, but I wanted to get all my questions right with the prospect of a prize at the end! I’m so glad I did, as I found it all really fascinating. Now I’m sure some of that is because I’m so obsessed with pencils, but my husband who is in no way arty and only came with us because he knew how much I wanted to go, found it really interesting too!
Derwent Pencil Museum Entrance Tunnel
Once we had paid our entrance fee (a family of 4 cost £19.50 at the time of writing this) we went through a tunnel which was like walking through the mines. I thought it was a nice touch and a little more interesting than just walking through a door and more importantly the children liked it and they were excited to start exploring.
Once through into the museum, you will find that the exhibition is just in one room. Now you might think it’s not that big but actually they have laid it out really well and fit a lot of information and displays in there for you to see. We found at the first display board there was a few people all trying tor read it at the same time, but then people spread out and even though it was holiday time, we didn’t feel it was too crowded even with quite a few people there.
As well as the information boards on the walls, there is a tv screen where you can choose from a few different videos. I wanted to watch the one of how the pencils are made in the factory. The video itself I found absolutely fascinating. What I would say is it was a shame that they didn’t have any subtitles and with the noise of the other visitors, I couldn’t hear what they were saying. If they could add subtitles this would seriously improve the videos and also make it more inclusive for deaf people. I wish I could have actually seen the pencils being made in the factory in person, but they don’t make them there anymore as they moved premises.
The aspects that I found most interesting myself, were seeing the old Derwent pencils and packaging and how they have changed over the years. I even spotted some tins from the 1980s and 90s that I still have! Also learning more about graphite and the mining of it, how pencils were made and how they’re made now, and in particular about a man called Charles Fraser-Smith and how he used the Derwent pencils to supply equipment and gadgets to secret agents or prisoners of war trying to escape during the Second World War.
Derwent Pencil Museum - Learn About Charles Fraser-Smith
Derwent Pencil Museum - Colouring Tables For the Children and Adults!
From a children’s point of view, my twins loved the fact that there was a colouring area and being near Halloween there were different Halloween pictures they could colour. I loved how the pencils provided on the tables were a variety from the Derwent ranges and not just from the cheaper end. My children particularly loved being able to use the Lightfast range as whilst I let them use most of my hundreds of pencils at home, I’ve not let them loose with those ones yet! I think its great to give the children the opportunity to see what decent pencils are actually like as most children I’m sure will only ever get the chance to use cheap children’s pencils with very little pigment in them. The only improvement would have been being able to sharpen the pencils as they had all gone rather blunt which my children found a little frustrating.
Another highlight for them was the pumpkin wall. My little boy in particular loved the display of children’s pumpkins and was very excited to colour his own one to have added to the wall. When we had finished in the museum and handed it in to one of the ladies in the shop, she made him feel very special. I loved how she asked him if he would like it to go on display and then took the time to cut it out there and then and asked if he would like to go with her to stick it onto the display. She could have quite easily said she would put it on later but that small act meant my little man came out beaming with pride.
Derwent Pencil Museum - The World's Largest Pencil
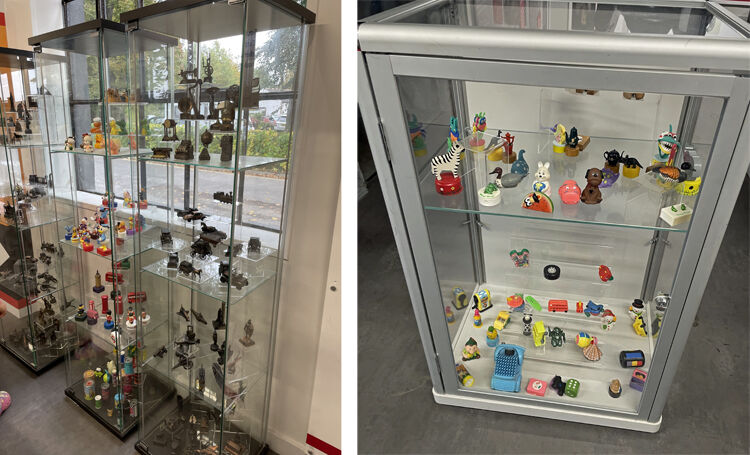
Derwent Pencil Museum - Collection Of Pencil Sharpeners
They were also really interested in all of the different pencil sharpeners that had been donated to the museum and they were asked to design their own sharpeners on their quiz sheet, which the lady in the shop asked them if they could explain to her making them feel like they had done amazing work.
When we had finished in the museum we took our sheets and clipboards back to the ladies in the shop, who took the time to mark them and talk to the children about what they had done. They were thrilled to receive colour pencils for their efforts and these came in very handy for colouring in the books they purchased in the shop in the car on the way home!
If you are a pencil lover, the shop itself is like a kid visiting a sweet shop! You can find single pencils, tins of pencils, a range of pads of paper, information books, children’s colouring books, notecards, water bottles, the list goes on. My children were very keen to spend a bit of their holiday money choosing a drawing book each. My daughter choose a Christmas activity book and my little boy chose learn how to draw dragons. It was nice for them to take the time to look at the books in person rather than choose something from the internet.
There is also a cafe right next to the shop which looked lovely, but we didn't visit on this particular occasion.
Overall we all throughly enjoyed our visit to the pencil museum and a big thank you to the two ladies working there who made our experience even more enjoyable. Even my husband who didn’t think he would like it really did and came away feeling like it was a few hours very well spent. I thought it would take about an hour, but in total we ended up being there for over 2 hours so I’m glad I purchased 3 hours for the car parking which cost me £3. You can park right outside the museum, but note it is not run by the museum itself and you have to pay for parking, although I found it quite reasonable compared to many car parks in the Lakes.
I would personally recommend visiting here if you are in the Lake District as it’s a fun and informative way to spend an hour or two. As we weren’t staying in Keswick ourselves, we tied it in with taking a picnic and visiting Derwent Lake. If you plan on visiting yourself, check out their website Derwent Pencil Museum for up to date prices and opening hours as in the winter months, they are closed on Mondays and Tuesdays.
Derwent Lake
What Black Paper Is Good To Use With Colour Pencils?
Struggling to choose a black paper to try out with your colour pencils? Have a read or watch the video and learn about three good options and what they have to offer.
There are various black papers available for drawing and some may be easier to purchase in some countries than others. I haven’t tried out and tested every black paper that is available but I have got three popular ones to share with you and look at what they are really like. As with any type of paper, it really comes down to personal choice and what qualities you are looking for in a paper.
You can either read what I have to say below or watch this video....
First off we have the Canson Mi Teintes black paper. (Just to clarify I am not referring to the touch version which is much rougher). Canson Mi Teintes has two different sides to the paper. One side is quite rough which a patterned honeycomb texture to the surface. The other side is smoother, but still has a bit of a texture to it. You can use either side of the paper. I personally prefer the smoother of the two sides as I find the honeycomb texture too rough for my liking. It is actually a pastel paper but can also be used with colour pencils. The thing with this paper is that it is only 160g In weight, so it’s the thinnest of the three papers I’m showing you today. It is available in sheets, rolls and pads of different sizes and it also comes in a range of 50 colours and it is quite reasonably priced. According to their website it is an acid free paper with colours being light resistant. How light resistant I do not know. Also I’ve found it handles a number of layers of colour pencil before it can’t take anymore.

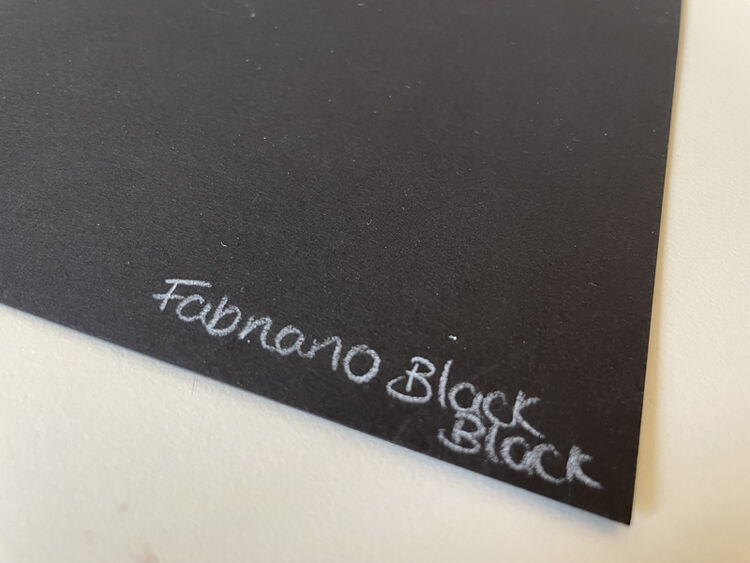
Next up we have Fabriano Black Black paper. Now, the thing that stands out about this paper is just how black it is compared to the other two papers. It is also 300gms in weight so it is like card, so nearly twice the weight of the Canson Mi Teintes. It is ideal for pastels, colour pencils and acrylic markers. In terms of what the surface itself is like, it is the smoothest of the three papers, being classed as very smooth. Whilst it is pretty smooth, it will take a few layers. If you used a fairly firm pressure I found I got about 6 or 7 layers before I couldn’t really apply more pencil. This is a good choice if you want a fairly smoothish paper, that’s not too thin and you want a truely black surface to work on. Particularly good if you are wanting to leave your background black on a picture. If you are wanting to get in lots of layers then you would need to use a fairly light pressure.
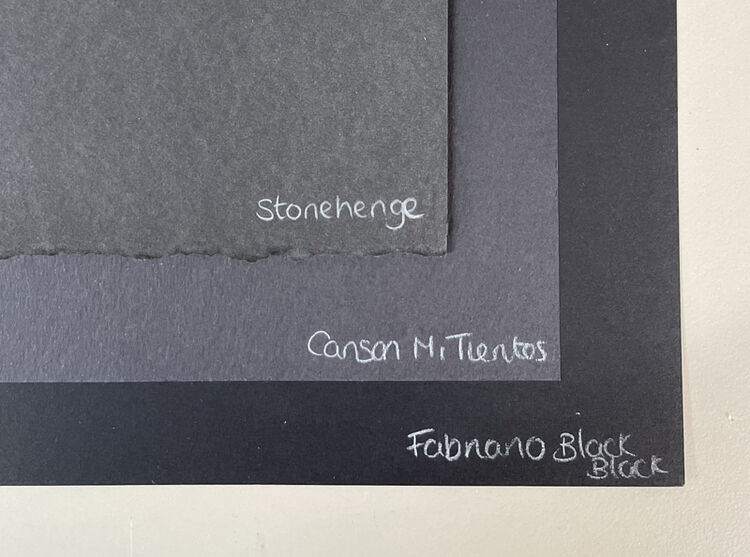
Last up we have black Stonehenge Fine Art paper. Is it like their popular white versions but in black. Now I am a fan of the white vellum paper they do so I was keen to try it in black. My first comment about it would be that the colour is definitely not as dark as the other two papers, it’s almost like a very dark grey. It has a smooth, slightly mottled surface to resemble vellum. It is made of cotton and is acid free. This one has a weight of 250g, so comes in the middle of these three papers. I find it is a good quality paper that takes the layers with colour pencils

Overall these are three good examples of black paper you can use with colour pencils. They each have their own unique properties so it really comes down to what you are looking for and what type of surface texture you enjoy working with and how heavy you want your paper.
So I’m summary you’ve got the Fabriano black black which is the blackest and heaviest weighted of the three. It is also the smoothest so I personally found it doesn’t take as many layers as the other two but if you like smooth paper then this one’s for you. The Stonehenge is the middle weight, good quality, takes the layers with a light texture to it but is the lightest black of the three so it depends how black you want your paper. Then the Canson Mi Teintes is the lightest weighted, but it has a choice of two surfaces depending which side of the paper you use. So it can take lots of layers and it’s the middle black in terms of these three paper here.

You can see here what a little bit of colour pencil can look like on the three. The white looks the brightest on the Fabriano black black and the Canson Mi Teintes. The Fabriano shows up the colours on white the best. Drawing straight into the black I personally prefer the look of the Stonehenge or Canson. You can also see I was able to draw on over the top with a white luminance on all of them. Personally I would be happy to use any of these three depending upon what I was looking for for a particular drawing.
If you’ve used any of these papers then let me know what you think of them or if you have used any other black papers for drawing with colour pencils then drop me a message and let me know what you thought of it. I always enjoy exploring new papers, so am interested to hear about your experiences.
I hope you’ve found that helpful and perhaps inspired you to test out a few for yourself.
Happy drawing!
Izzy x
There are various black papers available for drawing and some may be easier to purchase in some countries than others. I haven’t tried out and tested every black paper that is available but I have got three popular ones to share with you and look at what they are really like. As with any type of paper, it really comes down to personal choice and what qualities you are looking for in a paper.
You can either read what I have to say below or watch this video....
First off we have the Canson Mi Teintes black paper. (Just to clarify I am not referring to the touch version which is much rougher). Canson Mi Teintes has two different sides to the paper. One side is quite rough which a patterned honeycomb texture to the surface. The other side is smoother, but still has a bit of a texture to it. You can use either side of the paper. I personally prefer the smoother of the two sides as I find the honeycomb texture too rough for my liking. It is actually a pastel paper but can also be used with colour pencils. The thing with this paper is that it is only 160g In weight, so it’s the thinnest of the three papers I’m showing you today. It is available in sheets, rolls and pads of different sizes and it also comes in a range of 50 colours and it is quite reasonably priced. According to their website it is an acid free paper with colours being light resistant. How light resistant I do not know. Also I’ve found it handles a number of layers of colour pencil before it can’t take anymore.
Canson Mi-Tientes Black Paper
Next up we have Fabriano Black Black paper. Now, the thing that stands out about this paper is just how black it is compared to the other two papers. It is also 300gms in weight so it is like card, so nearly twice the weight of the Canson Mi Teintes. It is ideal for pastels, colour pencils and acrylic markers. In terms of what the surface itself is like, it is the smoothest of the three papers, being classed as very smooth. Whilst it is pretty smooth, it will take a few layers. If you used a fairly firm pressure I found I got about 6 or 7 layers before I couldn’t really apply more pencil. This is a good choice if you want a fairly smoothish paper, that’s not too thin and you want a truely black surface to work on. Particularly good if you are wanting to leave your background black on a picture. If you are wanting to get in lots of layers then you would need to use a fairly light pressure.
Fabriano Black Black
Last up we have black Stonehenge Fine Art paper. Is it like their popular white versions but in black. Now I am a fan of the white vellum paper they do so I was keen to try it in black. My first comment about it would be that the colour is definitely not as dark as the other two papers, it’s almost like a very dark grey. It has a smooth, slightly mottled surface to resemble vellum. It is made of cotton and is acid free. This one has a weight of 250g, so comes in the middle of these three papers. I find it is a good quality paper that takes the layers with colour pencils
Stonehenge Fine Art Black Paper
Overall these are three good examples of black paper you can use with colour pencils. They each have their own unique properties so it really comes down to what you are looking for and what type of surface texture you enjoy working with and how heavy you want your paper.
So I’m summary you’ve got the Fabriano black black which is the blackest and heaviest weighted of the three. It is also the smoothest so I personally found it doesn’t take as many layers as the other two but if you like smooth paper then this one’s for you. The Stonehenge is the middle weight, good quality, takes the layers with a light texture to it but is the lightest black of the three so it depends how black you want your paper. Then the Canson Mi Teintes is the lightest weighted, but it has a choice of two surfaces depending which side of the paper you use. So it can take lots of layers and it’s the middle black in terms of these three paper here.
Black Paper Test
You can see here what a little bit of colour pencil can look like on the three. The white looks the brightest on the Fabriano black black and the Canson Mi Teintes. The Fabriano shows up the colours on white the best. Drawing straight into the black I personally prefer the look of the Stonehenge or Canson. You can also see I was able to draw on over the top with a white luminance on all of them. Personally I would be happy to use any of these three depending upon what I was looking for for a particular drawing.
If you’ve used any of these papers then let me know what you think of them or if you have used any other black papers for drawing with colour pencils then drop me a message and let me know what you thought of it. I always enjoy exploring new papers, so am interested to hear about your experiences.
I hope you’ve found that helpful and perhaps inspired you to test out a few for yourself.
Happy drawing!
Izzy x
12 Simple Ways To Ignite Your
Imagination To Draw And Paint

Are you ever faced with staring at a blank page searching for inspiration? I know there have been plenty of times I have, and a sense of panic takes over and there’s suddenly something else that is really important and you must do it now (when really it could wait that little longer!) It can be so easy to lack inspiration and therefore motivation.
Deciding upon what to draw is the first decision you need to make as an artist, along with what medium you want to use. Now this might seem easier said than done! It’s all to easy to feel uninspired, like you really don’t know what to create, and lacking that drive to do so. Quite often you might find well meaning friends or family telling you what you should be drawing because more people would like that, or you'd be able to sell those. Following this strategy will most likely lead to you creating work that you aren't pleased with, because if your heart isn’t in it, it will show through in our work. When drawing or creating anything, you want to produce work that makes your heart sing. Even if you eventually take on commissions, don't feel forced into doing subjects you are not happy with, focus on those that bring you joy.
Even if you know what kind of subjects you enjoy, artists all go through periods where they lack inspiration. If you are not feeling inspired, it becomes all too easy to procrastinate! There are so many different types of subjects you can choose, from animals to people, to landscapes to flowers to still-life, the list is endless. The world is your oyster, and it can be somewhat overwhelming to feel inspired and make a choice.
There are many reasons as an artist that you might find yourself lacking inspiration. You might be going through a stressful time in your life, perhaps you are feeling a little burnt out, outside experiences such as the period we find ourselves at the point I write this with Coranvirus. For me, if I have put my heart and soul into a piece of work, I find it quite challenging to get inspired to create something new. These are some of the strategies that I use to help me get inspired and motivated to produce some new artwork, whether for pleasure or to sell.
1. CAPTURE EXPERIENCES THROUGH PHOTOGRAPHS
I cannot advocate enough collecting inspiration throughout your every day life. When out and about, take photographs of things that inspire you, that might be useful at a later date for backgrounds, or something you might like to draw; landscapes/whole things and close ups. These days many of us have smart phones which means it has become much easier to collect reference photos. I will go into more depth about taking, using and organising photo references in another blog.

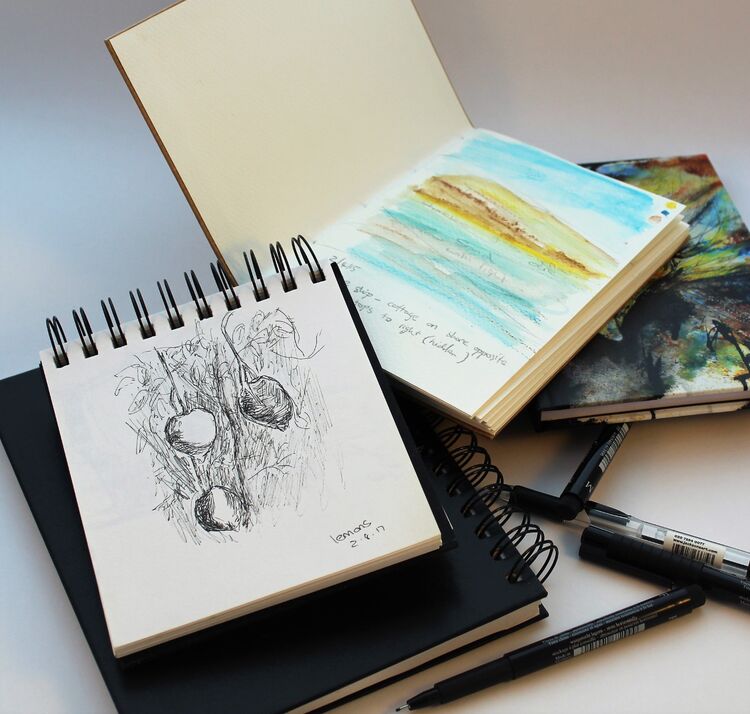
2. SKETCH
Get out that sketch book that you bought and put in a cupboard and take it out and about with you! Not only that use it to draw and make notes of things that captured your attention. It doesn’t even need to be a sketch book, use whatever paper and pencil/pen/paint you have, it doesn’t have to be fancy. Drawing without any pressure can be very motivating and help get those creative juices flowing. This also gives you a chance to not only see how you might compose what you are interested in, but allows you to really look and study how things look; textures, colours, shapes. Remember, if you are nervous about sketching, you don’t need to be. This can be a personal reference book for your eyes only!
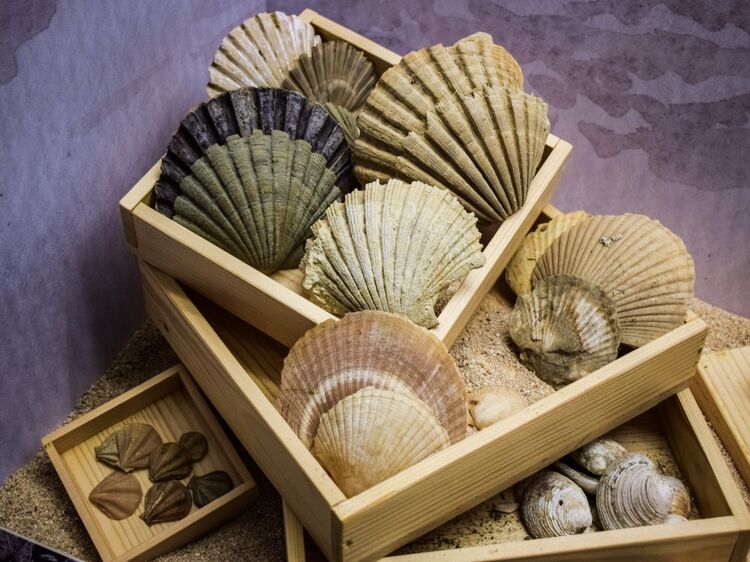
3. COLLECTING TREASURES
When out and about capturing photos and sketching, you could also collect actual items on your journeys and keep a box or baskets of inspirational treasures. It could contain anything you like, whatever items that inspire you from stones to shells to pieces of wood to ribbons, pieces of fabric, feathers, whatever captures you! Then when you need that bit of inspiration you can pull out your box of treasures and search through them. It also serves the purpose of having real life materials at hand when creating your art for you to study and draw from.
4. ONLINE REFERENCE MATERIALS
You may not be able to get out and about to collect your own photos or items, or you may not be able to access certain things very easily. My mum was partially disabled and generally housebound. She used to draw and paint whatever she could find around her or she would ask me to collect things for her. These days, it has become much easier for artists to access a huge supply of reference photos on the internet. Some of these are offered free and some are paid for. Whilst I personally love being able to take my own photos and collect reference materials in the way that I want, I appreciate the ability to have access to online reference materials where necessary. When using other people's reference photos, it is extremely important to check for copyright and see what you are allowed and not allowed to do. You cannot just use photos off Google. How would you feel if people used your work without permission? Even if you use photos from sites that give you permission to use them, it is still courteous to reference the photographer when posting your work.

Here are some sites you might find useful…
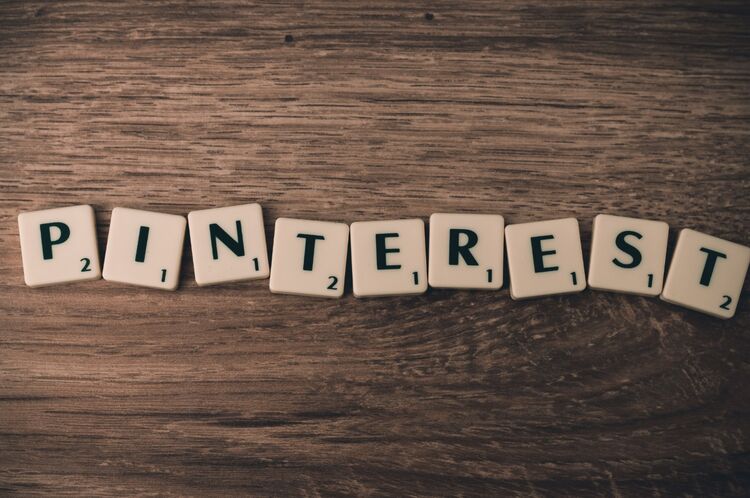
5. PINTEREST
This is a wonderful resource, full of so many wonderful pictures of absolutely everything. Make yourself an inspiration board, or boards and spend some time searching for different things that interest you. Just be careful not to end up spending all day looking, as its very easy to loose track of time! It is also something you can then add to at anytime and is easy to flick through to get inspiration whenever you need.
6. A PHYSICAL INSPIRATION BOARD
Another take on creating a Pintrest board is to actually create a physical collage board. This could be created by searching through magazines, your own photographs, printing off things you find. It doesn’t have to be the exact thing you want to draw or paint, you are looking for things that inspire you and that you really like to use as a starting point to spark your imagination.

7. LISTS
Keep a list of things that you would like to draw as they come to you. That way, when you are stuck you can look down your list and see if any jump out at you. You can also use it to search for supporting reference materials or as ideas of places, things to go and visit for yourself. You could create a list on your phone, so you can easily jot things down as they come to you, or you could write them down and pin a list to your wall.

8. MINDMAPS
Another way to get inspired is to create a mind map. These can be done on paper or electronically. You could start be asking yourself, what do I love? What makes me happy? Then you can carry on asking yourself questions based on these things. For example you might love animals. Break it down, what kind of animals? What do I particularly love about them?

9. USE YOUR EARS!
Listening to music might get your creative juices flowing. I'm the sort of person that doesn't like to sit in silence to work or draw, I don't find it very inspiring or motivational. The type of music I like to listen to, depends on my mood! You might find that different styles of music inspire you to create different styles of art work.

10. DOODLING
There are apparently a number of different benefits to doodling with one of them helping your mind to get creative and spark ideas. The beauty of doodling is it can be done anyway, anytime and is thinking through drawing, perfect for us creatives!

11. FOLLOW OTHER ARTISTS ON SOCIAL MEDIA
While you don’t want to just copy others (unless you are doing tutorials and learning), it can be very inspiring seeing what others create. I follow a huge array of artists with different styles and subject matters and love seeing what others create. To me it can be hugely inspiring and motivational, and sets my imagination and the old cogs going! I personally particularly love Instagram for this, as it is geared towards photos and its very easy to flick through the stories.

12. RELAX - You are probably not going to feel inspired and motivated to get creative if you are feeling stressed and wound up (unless perhaps if that is something that you are creating in your work!). There are different ways of taking some time out for yourself. The act of going for a walk and getting some fresh air can clear your mind and help you to feel inspired and focused. Meditation and yoga are other ways of relaxing and helping you be motivated and inspired. Whatever works for you, but taking time out for yourself can work wonders.

I hope you have found some of these ideas helpful to get you feeling inspired and motivated to get creative and draw or paint something you will love doing. If you have any ways of inspiring yourself that I've not mentioned then I would love to know what works for you?
Happy Drawing
Izzy x
You can also become an Izzy's Art Fantastic Follower and receive occasional emails with new products, top tips, offers, keep up to date what I'm creating, free how to mini guides and much more!
Deciding upon what to draw is the first decision you need to make as an artist, along with what medium you want to use. Now this might seem easier said than done! It’s all to easy to feel uninspired, like you really don’t know what to create, and lacking that drive to do so. Quite often you might find well meaning friends or family telling you what you should be drawing because more people would like that, or you'd be able to sell those. Following this strategy will most likely lead to you creating work that you aren't pleased with, because if your heart isn’t in it, it will show through in our work. When drawing or creating anything, you want to produce work that makes your heart sing. Even if you eventually take on commissions, don't feel forced into doing subjects you are not happy with, focus on those that bring you joy.
Even if you know what kind of subjects you enjoy, artists all go through periods where they lack inspiration. If you are not feeling inspired, it becomes all too easy to procrastinate! There are so many different types of subjects you can choose, from animals to people, to landscapes to flowers to still-life, the list is endless. The world is your oyster, and it can be somewhat overwhelming to feel inspired and make a choice.
There are many reasons as an artist that you might find yourself lacking inspiration. You might be going through a stressful time in your life, perhaps you are feeling a little burnt out, outside experiences such as the period we find ourselves at the point I write this with Coranvirus. For me, if I have put my heart and soul into a piece of work, I find it quite challenging to get inspired to create something new. These are some of the strategies that I use to help me get inspired and motivated to produce some new artwork, whether for pleasure or to sell.
1. CAPTURE EXPERIENCES THROUGH PHOTOGRAPHS
I cannot advocate enough collecting inspiration throughout your every day life. When out and about, take photographs of things that inspire you, that might be useful at a later date for backgrounds, or something you might like to draw; landscapes/whole things and close ups. These days many of us have smart phones which means it has become much easier to collect reference photos. I will go into more depth about taking, using and organising photo references in another blog.
'Capture Experience Through Photographs' (Image by Gerd Altmann from Pixabay)
2. SKETCH
Get out that sketch book that you bought and put in a cupboard and take it out and about with you! Not only that use it to draw and make notes of things that captured your attention. It doesn’t even need to be a sketch book, use whatever paper and pencil/pen/paint you have, it doesn’t have to be fancy. Drawing without any pressure can be very motivating and help get those creative juices flowing. This also gives you a chance to not only see how you might compose what you are interested in, but allows you to really look and study how things look; textures, colours, shapes. Remember, if you are nervous about sketching, you don’t need to be. This can be a personal reference book for your eyes only!
Sketch (Image by Carly Lawson from Pixabay)
3. COLLECTING TREASURES
When out and about capturing photos and sketching, you could also collect actual items on your journeys and keep a box or baskets of inspirational treasures. It could contain anything you like, whatever items that inspire you from stones to shells to pieces of wood to ribbons, pieces of fabric, feathers, whatever captures you! Then when you need that bit of inspiration you can pull out your box of treasures and search through them. It also serves the purpose of having real life materials at hand when creating your art for you to study and draw from.
Collecting Boxes of Treasures (Image by Dimitris Vetsikas from Pixabay)
4. ONLINE REFERENCE MATERIALS
You may not be able to get out and about to collect your own photos or items, or you may not be able to access certain things very easily. My mum was partially disabled and generally housebound. She used to draw and paint whatever she could find around her or she would ask me to collect things for her. These days, it has become much easier for artists to access a huge supply of reference photos on the internet. Some of these are offered free and some are paid for. Whilst I personally love being able to take my own photos and collect reference materials in the way that I want, I appreciate the ability to have access to online reference materials where necessary. When using other people's reference photos, it is extremely important to check for copyright and see what you are allowed and not allowed to do. You cannot just use photos off Google. How would you feel if people used your work without permission? Even if you use photos from sites that give you permission to use them, it is still courteous to reference the photographer when posting your work.
Online Reference Materials (Image by Ralf Kunze from Pixabay)
Here are some sites you might find useful…
- Pixabay
5. PINTEREST
This is a wonderful resource, full of so many wonderful pictures of absolutely everything. Make yourself an inspiration board, or boards and spend some time searching for different things that interest you. Just be careful not to end up spending all day looking, as its very easy to loose track of time! It is also something you can then add to at anytime and is easy to flick through to get inspiration whenever you need.
Pinterest (Image by William Iven from Pixabay)
6. A PHYSICAL INSPIRATION BOARD
Another take on creating a Pintrest board is to actually create a physical collage board. This could be created by searching through magazines, your own photographs, printing off things you find. It doesn’t have to be the exact thing you want to draw or paint, you are looking for things that inspire you and that you really like to use as a starting point to spark your imagination.
A Physical Inspiration Board (Image by Gerd Altmann from Pixabay)
7. LISTS
Keep a list of things that you would like to draw as they come to you. That way, when you are stuck you can look down your list and see if any jump out at you. You can also use it to search for supporting reference materials or as ideas of places, things to go and visit for yourself. You could create a list on your phone, so you can easily jot things down as they come to you, or you could write them down and pin a list to your wall.
Lists (Image by RitaE from Pixabay)
8. MINDMAPS
Another way to get inspired is to create a mind map. These can be done on paper or electronically. You could start be asking yourself, what do I love? What makes me happy? Then you can carry on asking yourself questions based on these things. For example you might love animals. Break it down, what kind of animals? What do I particularly love about them?
Mindmap (Image by Athree23 from Pixabay)
9. USE YOUR EARS!
Listening to music might get your creative juices flowing. I'm the sort of person that doesn't like to sit in silence to work or draw, I don't find it very inspiring or motivational. The type of music I like to listen to, depends on my mood! You might find that different styles of music inspire you to create different styles of art work.
Listen to Music (Image by Bernd Everding from Pixabay)
10. DOODLING
There are apparently a number of different benefits to doodling with one of them helping your mind to get creative and spark ideas. The beauty of doodling is it can be done anyway, anytime and is thinking through drawing, perfect for us creatives!
Doodling (Image by Pexels from Pixabay)
11. FOLLOW OTHER ARTISTS ON SOCIAL MEDIA
While you don’t want to just copy others (unless you are doing tutorials and learning), it can be very inspiring seeing what others create. I follow a huge array of artists with different styles and subject matters and love seeing what others create. To me it can be hugely inspiring and motivational, and sets my imagination and the old cogs going! I personally particularly love Instagram for this, as it is geared towards photos and its very easy to flick through the stories.
Social Media (Image by Gerd Altmann from Pixabay)
12. RELAX - You are probably not going to feel inspired and motivated to get creative if you are feeling stressed and wound up (unless perhaps if that is something that you are creating in your work!). There are different ways of taking some time out for yourself. The act of going for a walk and getting some fresh air can clear your mind and help you to feel inspired and focused. Meditation and yoga are other ways of relaxing and helping you be motivated and inspired. Whatever works for you, but taking time out for yourself can work wonders.
Relax (Image by Pexels from Pixabay)
I hope you have found some of these ideas helpful to get you feeling inspired and motivated to get creative and draw or paint something you will love doing. If you have any ways of inspiring yourself that I've not mentioned then I would love to know what works for you?
Happy Drawing
Izzy x
You can also become an Izzy's Art Fantastic Follower and receive occasional emails with new products, top tips, offers, keep up to date what I'm creating, free how to mini guides and much more!
9 Top Tips For Taking Photographs Of Pets
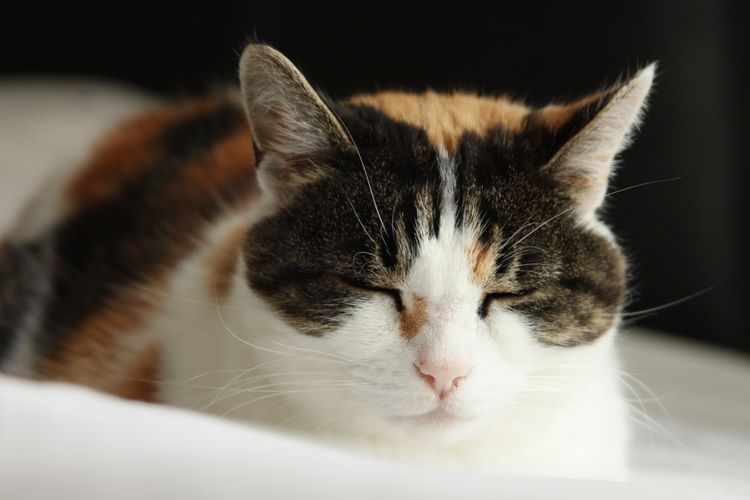
There will come a time when the unthinkable happens and you have to say goodbye to your pet. This is a heartbreaking time for all of the family as a pet is a really big part of that family. Recently, I had to say goodbye to my cat Tango. She was such a special cat to not only me but my also my children. Her quirky personality, incredibly loud miaow (she was deaf) sweet nature has left a very big hole in our lives. I began searching through all of my photos, as I really wanted to find some special ones that I could print off for the children to see and also because I would love to draw a picture of her.
It really got me thinking, that I have lots of quick snap shots on my phone, but very few special pictures. I also find this quite often with commissions, that people don’t have great photos to work from and of course it can be too late to take any more. So I wanted to write some top tips to help you take some great photos of your pets, whether just to print off or one day you might like to commission someone to do a piece of artwork for you, or even have a go at drawing them yourself!
1. Be ready!
Now this might sound obvious, but your pet might not necessarily wait around long to have their picture taken! It is no good getting them in position only to find that you’ve not got your phone set up, or your camera turned on, or worse still the batteries are flat!
Be prepared that you will probably need to take photos on several different occasions as your pet will likely get bored or they will keep trying to come up to the camera! Set your camera or phone to the highest resolution possible. If you don't know how to do this Google the following: How do I change the resolution on my xx (device name/model).
2. Where to take your photos
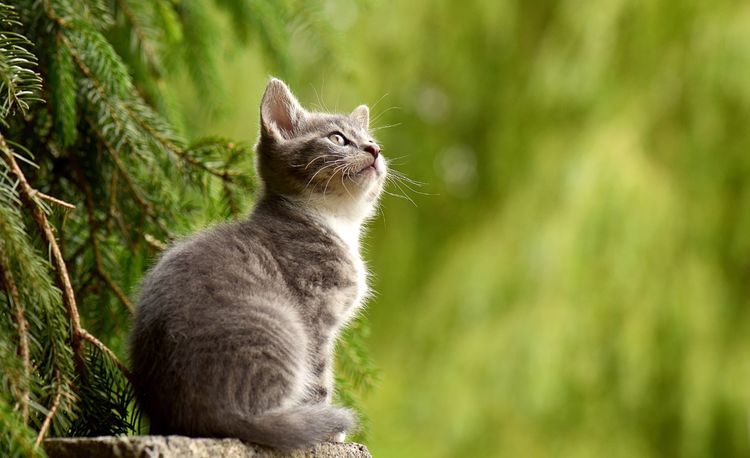
You can take your photos wherever you like, and its worth while trying various locations and different times of day. First of all though, choose a view point that suits the character of your pet. For example, you might choose to have your cat sleeping in their favourite spot, sitting on a window ledge or bench watching the world go by, lying on their favourite cushion.
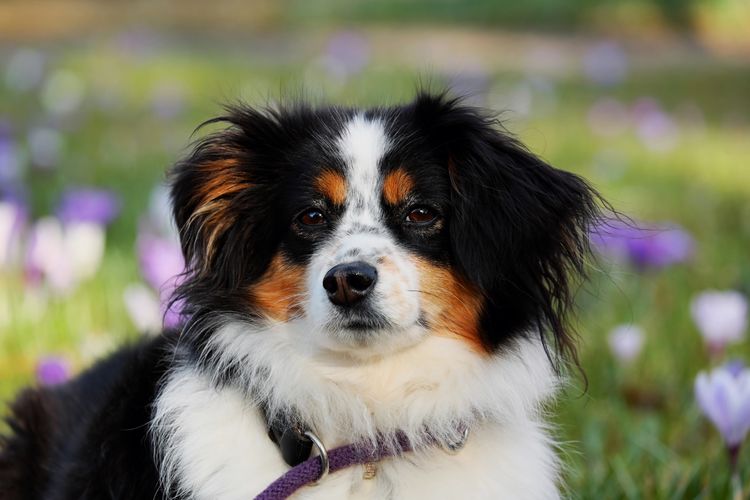
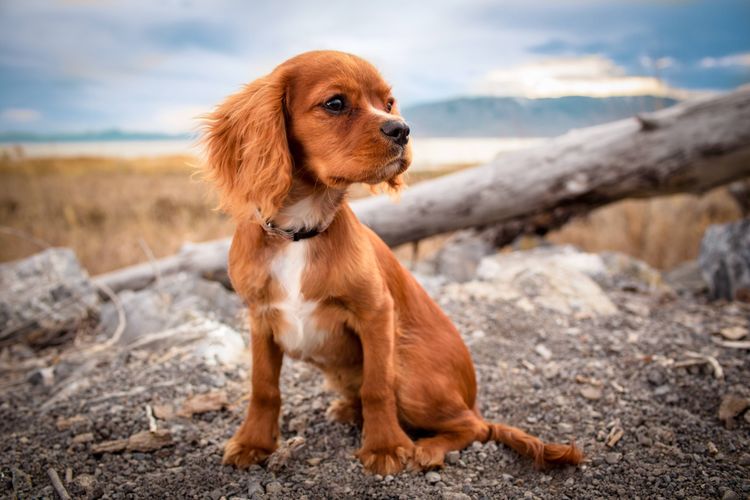
For a dog, you might take a head shot looking slightly off centre from the camera looking off into the distance, or lying down having just woken from a nap, sitting down ready to play with their favourite toy, running in the woods.

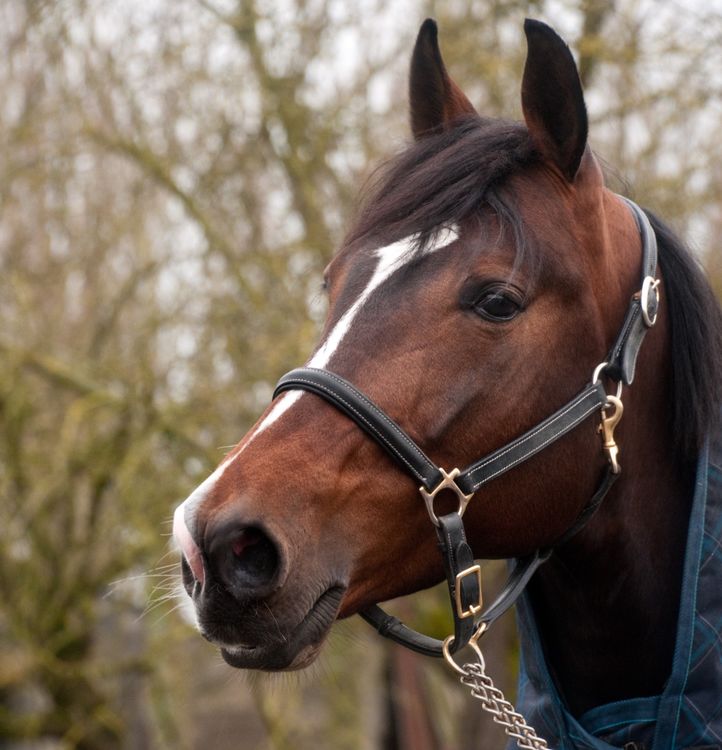
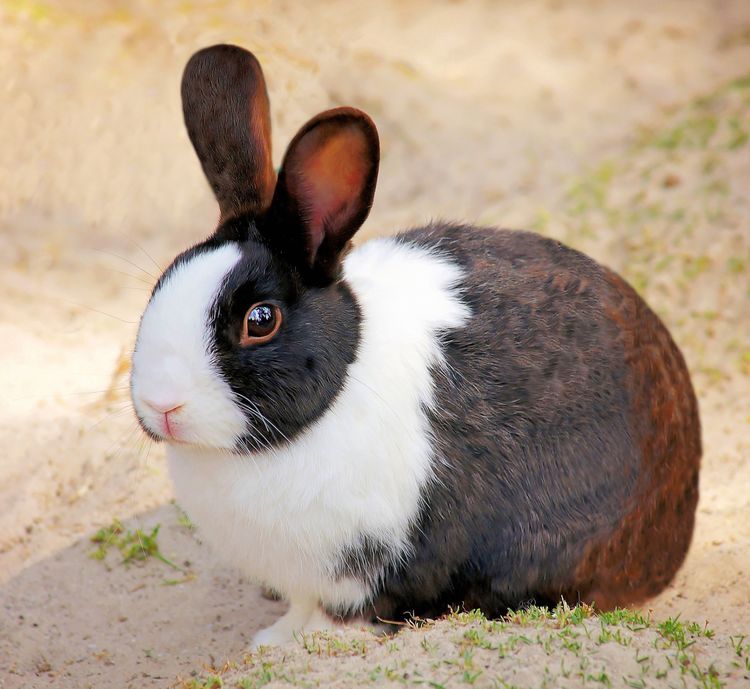
The same applies to any other type of pet, a rabbit in the grass in the garden, a horse at the fence or in the field. You know your pet and where they feel comfortable. The more contented they are, the easier it is to capture them.
3. Lighting
First all I highly recommend that you do not use flash. Direct flash is very unflattering and creates red eye. The best light is natural lighting. If possible outside is a good setting, ideally in some shade rather than very harsh sunlight.
If photographing indoors, make sure that there is good light on your pet. Ideally have them placed by a window or open door.
I would also suggest not using backlighting (the light shining on back of the animals head) as this puts their face in complete shadow and you will loose the detail in their face.
4. Background.
Now this really depends on the purpose of the photographs. If you are taking them with a view to being used to commission an artist or to draw/paint them yourself, then the background really doesn’t matter. An artist can be as creative as they like with backgrounds to suit your pet. If you are taking the photos to display them then I find the most successful backgrounds to be simple out of focus ones that allow your pet to really stand out in the picture. Most cameras on phones these days will blend out background when you are closely focused on an object. If you have a proper camera, then it is worth investigating how to use it to change the settings so you can do this.
The other alternative with backgrounds, is to think about your favourite locations that your pet goes, whether thats simply the garden, or further afield like the woods, the park or even the beach. Having photographs in these places is a good reminder of them and what they enjoyed doing.

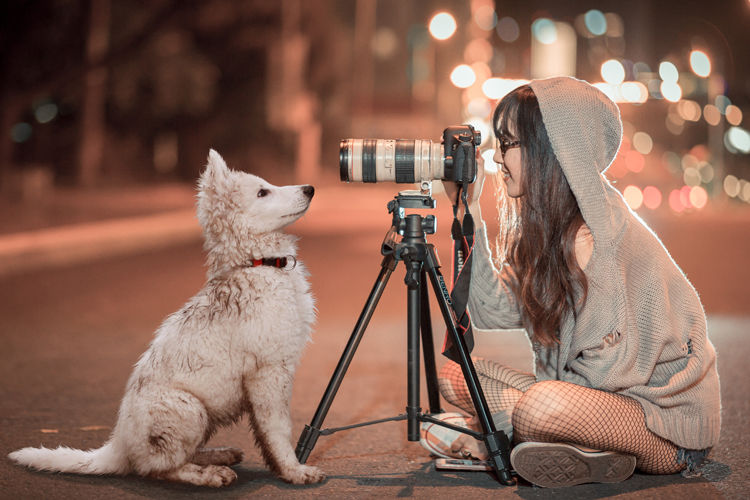
5. Enlist some help
Having someone to assist you with taking photos of your pet might be helpful if you are struggling to get them to stay still! They can help get them in position so you can quickly take some photos or they can wave toys/make noises to get them to look in the direction of the camera or slightly off to one side of you prefer a 3/4 face shot as opposed to straight on. Alternatively, you can be the one working with your pet while someone else takes the photographs. Try photographing a range of different poses while you’ve got someone on hand to assist.

6. Composition
So you’ve got your camera prepared, now it’s time to think about composition. Generally speaking its a good idea to get down to your pets eye level. Photos taken from this angle rather than looking down make for a better portrait and eliminates the element of distortion. If they are at ground level instead of on a sofa or window ledge this will involve you getting down on the floor with your camera.
This isn't to say that other angles won't work, sometimes you can get some interesting pictures that portray your pets personality beautifully, but you need to be aware of whether the element of distortion works.
 An example of distortion
You also need to think about whether you want whole body or face. If you are wanting a facial shot then you need to get in closer. Whether you are taking whole body or face, you need to think about the angle they are at compared to your camera. So while you might take some photographs where your pet is face on to the camera, it is also worth considering taking your pets photograph at a three quarter angle so they are looking off in the distance at something else. This is where having someone assist you can be helpful.

7. Fill the Frame
When taking the photos try to fill the frame with your pet. You don’t want your pet to end up as a tiny part of the photo thats difficult to really see them.
Having some photos of your pet where you can see the details of their face is so important. When they are no longer around being able to see them close up is important to help remember them. Also is you want to draw them or commission someone else to then this will be particularly important to create an accurate drawing. Also remember not to cut off legs, paws ears etc in awkward places.

8. Photographing more than one animal!
If you are trying to take a photograph of two or more pets together, then I won’t lie, this can be challenging! If you are taking the picture to have as a photograph in your house, then I would highly suggest enlisting the help of someone else! If for example you are photographing dogs then having someone for them to focus on so they are both looking in the same direction is very helpful!

If you are taking photographs to draw from or to commission an artist, then there are ways around this. It is possible to work from separate photographs and drawing them in the same picture. It is helpful to have photographs from the same light source and direction so even if you are struggling to get the perfect shot of them together, take the photos in the same location at the same time. It is also useful to have some photographs of them together even if not the perfect shot, so that the person drawing them can compare their size.You never know, you might get lucky and get the perfect picture of your animals together!
9. Take many many many photos!
We are very lucky today with the use of digital photography. It means we can take as many photographs as we want very easily and just delete the ones we don’t want. Taking lots and lots of photos, whether in one sitting or ideally over lots of different occasions gives you much more chance of capturing that perfect photo. Most importantly have fun with this. If you are relaxed then your pet will be.
10. Reward your pet!

Most importantly don't forget to give your pet some much deserved fuss and treats for being the superstar that they are at having their photo taken! Hopefully you will have managed to get some fantastic photos to print off, to draw from or even one day commission an artist to create a fantastic painting for you.
Happy photographing!
Izzy x
*photographs are either my own or from Pixabay
It really got me thinking, that I have lots of quick snap shots on my phone, but very few special pictures. I also find this quite often with commissions, that people don’t have great photos to work from and of course it can be too late to take any more. So I wanted to write some top tips to help you take some great photos of your pets, whether just to print off or one day you might like to commission someone to do a piece of artwork for you, or even have a go at drawing them yourself!
1. Be ready!
Now this might sound obvious, but your pet might not necessarily wait around long to have their picture taken! It is no good getting them in position only to find that you’ve not got your phone set up, or your camera turned on, or worse still the batteries are flat!
Be prepared that you will probably need to take photos on several different occasions as your pet will likely get bored or they will keep trying to come up to the camera! Set your camera or phone to the highest resolution possible. If you don't know how to do this Google the following: How do I change the resolution on my xx (device name/model).
2. Where to take your photos
You can take your photos wherever you like, and its worth while trying various locations and different times of day. First of all though, choose a view point that suits the character of your pet. For example, you might choose to have your cat sleeping in their favourite spot, sitting on a window ledge or bench watching the world go by, lying on their favourite cushion.
For a dog, you might take a head shot looking slightly off centre from the camera looking off into the distance, or lying down having just woken from a nap, sitting down ready to play with their favourite toy, running in the woods.
The same applies to any other type of pet, a rabbit in the grass in the garden, a horse at the fence or in the field. You know your pet and where they feel comfortable. The more contented they are, the easier it is to capture them.
3. Lighting
First all I highly recommend that you do not use flash. Direct flash is very unflattering and creates red eye. The best light is natural lighting. If possible outside is a good setting, ideally in some shade rather than very harsh sunlight.
If photographing indoors, make sure that there is good light on your pet. Ideally have them placed by a window or open door.
I would also suggest not using backlighting (the light shining on back of the animals head) as this puts their face in complete shadow and you will loose the detail in their face.
4. Background.
Now this really depends on the purpose of the photographs. If you are taking them with a view to being used to commission an artist or to draw/paint them yourself, then the background really doesn’t matter. An artist can be as creative as they like with backgrounds to suit your pet. If you are taking the photos to display them then I find the most successful backgrounds to be simple out of focus ones that allow your pet to really stand out in the picture. Most cameras on phones these days will blend out background when you are closely focused on an object. If you have a proper camera, then it is worth investigating how to use it to change the settings so you can do this.
The other alternative with backgrounds, is to think about your favourite locations that your pet goes, whether thats simply the garden, or further afield like the woods, the park or even the beach. Having photographs in these places is a good reminder of them and what they enjoyed doing.
5. Enlist some help
Having someone to assist you with taking photos of your pet might be helpful if you are struggling to get them to stay still! They can help get them in position so you can quickly take some photos or they can wave toys/make noises to get them to look in the direction of the camera or slightly off to one side of you prefer a 3/4 face shot as opposed to straight on. Alternatively, you can be the one working with your pet while someone else takes the photographs. Try photographing a range of different poses while you’ve got someone on hand to assist.
6. Composition
So you’ve got your camera prepared, now it’s time to think about composition. Generally speaking its a good idea to get down to your pets eye level. Photos taken from this angle rather than looking down make for a better portrait and eliminates the element of distortion. If they are at ground level instead of on a sofa or window ledge this will involve you getting down on the floor with your camera.
This isn't to say that other angles won't work, sometimes you can get some interesting pictures that portray your pets personality beautifully, but you need to be aware of whether the element of distortion works.
You also need to think about whether you want whole body or face. If you are wanting a facial shot then you need to get in closer. Whether you are taking whole body or face, you need to think about the angle they are at compared to your camera. So while you might take some photographs where your pet is face on to the camera, it is also worth considering taking your pets photograph at a three quarter angle so they are looking off in the distance at something else. This is where having someone assist you can be helpful.
7. Fill the Frame
When taking the photos try to fill the frame with your pet. You don’t want your pet to end up as a tiny part of the photo thats difficult to really see them.
Having some photos of your pet where you can see the details of their face is so important. When they are no longer around being able to see them close up is important to help remember them. Also is you want to draw them or commission someone else to then this will be particularly important to create an accurate drawing. Also remember not to cut off legs, paws ears etc in awkward places.
8. Photographing more than one animal!
If you are trying to take a photograph of two or more pets together, then I won’t lie, this can be challenging! If you are taking the picture to have as a photograph in your house, then I would highly suggest enlisting the help of someone else! If for example you are photographing dogs then having someone for them to focus on so they are both looking in the same direction is very helpful!
If you are taking photographs to draw from or to commission an artist, then there are ways around this. It is possible to work from separate photographs and drawing them in the same picture. It is helpful to have photographs from the same light source and direction so even if you are struggling to get the perfect shot of them together, take the photos in the same location at the same time. It is also useful to have some photographs of them together even if not the perfect shot, so that the person drawing them can compare their size.You never know, you might get lucky and get the perfect picture of your animals together!
9. Take many many many photos!
We are very lucky today with the use of digital photography. It means we can take as many photographs as we want very easily and just delete the ones we don’t want. Taking lots and lots of photos, whether in one sitting or ideally over lots of different occasions gives you much more chance of capturing that perfect photo. Most importantly have fun with this. If you are relaxed then your pet will be.
10. Reward your pet!
Most importantly don't forget to give your pet some much deserved fuss and treats for being the superstar that they are at having their photo taken! Hopefully you will have managed to get some fantastic photos to print off, to draw from or even one day commission an artist to create a fantastic painting for you.
Happy photographing!
Izzy x
*photographs are either my own or from Pixabay
Listen to me live on Radio Secklow
Listen to me talking to Stuart Moore live on Radio Secklow 105.5 about my life as a coloured pencil artist, how I got to where I am and what its like being a wildlife and pet portrait artist.
Loving Or Loathing The New Derwent Lightfast Coloured Pencils? Read My Review To Find Out What I Think......

If you are a coloured pencil artist like myself, then I’m sure you have heard about Derwent releasing their Lightfast range with the first 36 colours in 2018 and now the next 36 have been released in June 2019. There is also a wooden box set of 100 due to be released, although I’ve not seen a date for these as yet. I have to say from the outset, that I have an addiction to new art materials, particularly coloured pencils! I’m like a kid in a sweet shop, so I have been very excited waiting for the release of these next 36 pencils. I was very restrained when the first set became available and I only bought a few to try. Since then, I have gradually been collecting them all. I did however, have some questions about them;
What the new set of 36 colours actually like?
What would the range of colours across the 72 be like?
How would they preform?
Would the new set of 36 be available as a tin of 36 without having to buy all 72?
I know they are called Lightfast, but how lightfast are they really?
In this blog, I shall be looking at all of these questions and giving my own opinions on them.
Are these new set of 36 pencils available as a separate set?

First of all the good news is that you are able to purchase these second set of 36 pencils in a separate tin or as individual pencils. Prices vary depending where you purchase them. On the Derwent’s own website, a tin of 36 is £109.99, a tin of 72 is £229.99, a wooden box of 48 is £169.99 and individual pencils retail at £3.20 each. If you shop around then there are some shops offering these at cheaper prices. For example, Cult Pens have a tin of 36 for £73.69 and a tin of 72 for £149. They also offer individual pencils for £3.20 but they currently have an offer on of 3 for 2. If you are just looking for individual pencils then I can personally recommend the lovely Emma Kerridge who runs the coloured pencil shop online. She offers individual Lightfast pencils at £2.90 each and gives any members of the UKCPS a 10% discount. I have always had an excellent service from her and never had any problems with pencil leads breaking with all the brands I have purchased from her.
First Impressions
The new tin is the same picture as the first set of 36 pencils. The only difference appears to be a sticker on it saying 36 new pencils. The picture on it is by the very talented Jessie Lane and shows what can be achieved with these pencils. I’ve got to say, I was so excited when these arrived and I couldn’t wait to open them and try them. First impressions were I liked the look of the new colours and could immediately spot a number of pencils that I thought would get used a lot in drawing animals which is what I mainly focus on.

So what colours are actually in this news set of 36?
Well, there is a couple of bright yellows (Banana and Mustard) and oranges (Amber Gold and Flame). Four new shades of reds ranging from the bright to the very dark (Derwent Red, Strawberry, Cherry Red and Merlot). There is only one new pink (Dusky Pink) and three shades of purple (Deep Rose, Purple and Wild Lavender). The new set is heavily weighted towards blue and green with seven new shades of blue that are mid to dark in shade (Deep Blue, Sapphire, Denim, Mid Blue 70%, Midnight Blue, Dark Indigo and Ocean Blue Dark), two turquoise colours (Light Aqua and Turquoise Green) and five new shades of green (Vivid Green, Pine, Grass Green, Grass Green (70%) and Foliage) that look very useful for foliage and landscapes. The new set also consists of a Light Bronze, three orange sienna colours (Persian Orange, Burnt Sienna and Mars Orange), four shades of grey (Fossil Grey, Moonstone, Granite and Platinum) and a Mars Black.
So how do these colours fit in with the first set of 36?
Well as you can see the range was in need of some more shades of yellow as the first set had one bright yellow (Sun Yellow) and one light creamy yellow (Champagne) The two new yellows (Banana and Mustard) are actually quite similar in colour when I tested them and although nice colours, I wish there was a shade between the Champagne and the brighter yellows. For example, in the Prismacolor range I like the Eggshell which is a muted yellow and I feel that this is missing from the current 72 pencils. Having looked at the Derwent Colour chart for all 100 pencils, it could be that the Gold could perhaps fill this role but it is difficult to tell from a tiny patch of colour on a computer scene, so I will have to wait and see!

The original set of 36 didn’t contain any oranges and so it was necessary for them to include some in this next set of 36. There is however only two shades, one is a yellowy orange and one more of a red orange. There are six other shades of yellow and orange due to be released in the set of 100, and I feel these are very much needed as currently this is the area lacking the most in terms of choice. I am particularly looking forward to trying out the Golden Sun, Apricot and Dark Honey which are orangey yellow in tone and I think could be very useful for drawing tigers.
For the subjects I tend to draw, I don’t use a lot of reds but I can see that the new shades were very much needed as there was previously only one available. I can see how they would be very useful for drawing flowers and fruits etc. For me personally, I can see that the new dark red Merlot would be the most useful, but I would have liked to have seen another shade of dark red to go alongside this.
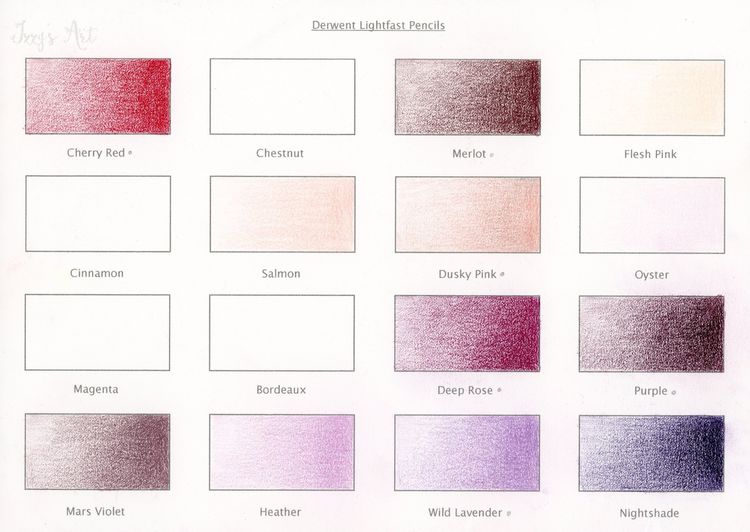
The current range of pinks are either pale or muted in tone. I have to say I do like their tones but currently they are missing a bright pink which I would want to include in my set which I think the Magenta from the set of 100 includes.
One of the things I particularly liked about the first set of 36 pencils was the range of purples and this has been made even better with their new additions. While I like a couple of shades of purple from other brands of pencil that have good lightfast ratings, I felt that this was something lacking in my palette to an extent. I am very pleased to have these new colours to play with but the Violet, Blue Violet and Nightshade from set 1 are still my favourites!
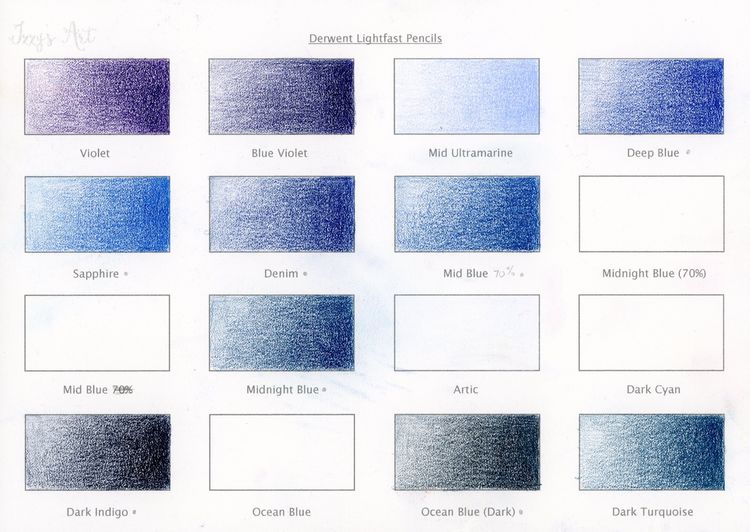
As I mentioned before, this set is heavy on the blue. It needed to be as there were only two available in the first set of very pale (Artic) and a bright mid tone blue (Mid Ultramarine) which I have to say I have used both quite a lot. In this second set, there is more emphasis on mid to very dark blue tones which could be useful for water. However, I would have liked to see a couple more shades of light to mid tone blues for skies. I feel there is quite a jump from the Mid Ultramarine to the next shades.

I was very excited to see the Light Aqua and Turquoise Green. What beautiful shades of colours! I now just need to find something to draw where I can really test them out!
This set of 36 contains some great looking shades of green that would be useful for landscapes. The first set had three very dark greens that are very similar in colour. The addition of these new shades has really given more variety and there are still five more shades of green to come in the set of 100. I shall be very interested to test these out.

I like the addition of the three orange browns (Persian Orange, Burnt Sienna and Mars Orange) I shall personally be testing these out when I next draw a tiger! There are some lovely shades of brown across the 72 pencils. The colour that is missing for me looks similar to the Autumn Brown which is part of the 100 set.

The four new shades of grey released in this set were needed to increase the range and there are some lovely shades. For me they could do with adding a couple of darker greys.
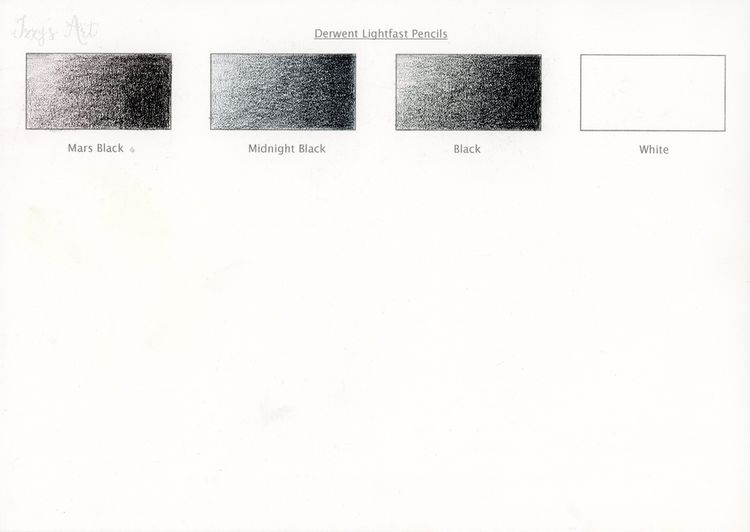
What I do like about these pencils is the fact that there are three shades of black. I really like the new Mars Black which has a browny purple hue to it.
Overall, I think these new set of 36 pencils really extend the range and fill in most of the gaps that were in the first set.
What are my favourite colours?

Those colours that you use the most in your work really come down to personal choice and what subject matter you draw. For me though, I have developed some firm favourites from the first 36 pencils and I can definitely see I will be adding to that list with these next set. From the first set of 36, I have been using Violet, Blue Violet and Nightshade an awful lot. I have found them to be brilliant in layering to create a good deep black along with blues and browns. I also really like the Mid Ultramarine, and find this a great fresh light blue. The other three colours I particularly like to use when drawing animals have been the Yellow Ochre, Wheat and Sandstone. From the new set of 36 pencils, I can already see that the Fossil Grey, Moonstone, Dusky Pink, Mars Violet, Persian Orange, Burnt Sienna and Mars Orange will be very useful for drawing animals.
What are they actually like to use?
So onto the exciting part of testing them out. When trying out pencils and testing them and what the colours are like, I like to do so on the type of paper I’m drawing on to see how they perform. I also like to see what they are like with different pressures so I do a graduated scale. I have done this on quite large rectangles, mainly so I can share the colours with you clearly. You are welcome to download this template here if you would like to use it.
Downloadable Derwent Lightfast Pencils Blank Colour Chart
If you want to create smaller charts, then just print them out at 2 or 4 to a page to suit your needs. I have included all 100 colours on my chart ready for when the next pencils become available hence the blank spaces.
Firstly in terms of what they look like and feel like to hold. I personally really like the shape of the round barrel and I like the fact they are wider. I also like the wooden barrels with the colour at the ends. This is really useful if you have them stored upright. If you are someone who stores their pencils in pots with the points sticking up then this is not very helpful. The names of the pencils are written in black on the sides which is easy to read. I have found on a couple of my pencils that the name has unfortunately rubbed away, but I can still read what it says.
I have personally always preferred using what is referred to as wax based pencils over oil based. However, these pencils have fitted into my collection amazingly and they work really well with my other brands. They have made me look at oil based coloured pencils with a change of heart. What I like about them is that there are very creamy and buttery to apply, yet they are fairly hard which is good for details as well as blocks of colour. They are great for applying light layers and then blending with more pressure in the final layers. I did find though that the lightest colours seem harder than some of the darker colours. Also I found some of the lighter colours such as the Flesh Pink quite scratchy in comparison to the darker colours. I’m not entirely sure why, but the Dusky Pink had some grey in it when I did my tester square. I’ve never had this happen before and I’m not sure if it was something that got stuck to the lead when sharpening or if it was in the lead. It will definitely make me double check my pencils before using them though. Overall in terms of what they feel like to use I think Derwent have struck a winning balance.
How Lightfast are they?
Now these pencils might be called Lightfast, but I wanted to find out just how Lightfast they actually are! The information I have found out is taken directly from the Derwent Website. Derwent say;
'The revolutionary core is resistant to prolonged colour change ensuring artwork will not fade for up to 100 years under museum conditions.’
'Many people equate lightfastness with permanence.This is not strictly accurate as many other factors can affect the permanence of your work such as humidity, temperature, atmospheric pollution, reactions between different pigments and chemicals, the paper you use, and even the way you use your art materials.
For optimum performance of your pencils follow these simple guidelines:
1. Use high quality pH neutral heavy weight paper
2. Create strong, even layers and avoid damaging the substrate
3. Do not hang or exhibit your work in direct sunlight
4. Mount your work behind glass, preferably with an ultra violet absorbing coating
5. Remember that the lightfastness of Derwent Lightfast may be adversely affected if mixed with other products’
The Lightfast pencils have had two types of testing ASTM D6901 and ISO 105. I wanted to look a little more into what this actually means. The ASTM D6901 is the international standard for lightfast testing. According to the Coloured Pencil Society of America;
‘D6901 uses two types of lightfast testing, a sunlight test and a xenon arc test, to simulate the effects that prolonged sun exposure will have on a colored pencil. With the results of these tests, a colored pencil can then be accurately placed into a lightfastness category. Lightfastness categories are I, II, III, IV, and V with I being the best (very lightfast) and V being the worst (fugitive/not lightfast). Only pencils with lightfastness ratings of either I or II can be labeled as complying with the standard. For an entire line of colored pencils to be labeled as D6901 compliant, every pencil must have a lightfast rating of either I or II.’
The ISO 105 testing is measured on the Blue Wool Rating scale where the numbers work in the opposite direction. So 1-3 poor, 4-5 fair, 6 is good, 7 is very good and 8 are excellent. I can only find a broken down chart of these results for the first 36 pencils. Of which most where classed as excellent, 5 as very good and there were two classed as good. However all of these first 36 pencils received a I on the D6901 standard tests which is a little confusing!
So what does all this actually mean?! Having looked at the Derwent colour chart, they have classified all 100 of these pencils as either a 1 or 2. There appears to be 63 pencils classified as a 1 and 37 classified as a 2. All of the first set of 36 pencils have a rating of Lightfast 1 and in the new set of 36 pencils, 21 have a lightfast rating of 1 and 15 pencils have a lightfast rating of 2.
From what I understand a lightfast rating of 1 is excellent and under museum conditions as mentioned above is over 100 years. A lightfast rating of 2 is very good and under museum conditions is 50-100 years.
Overall conclusions
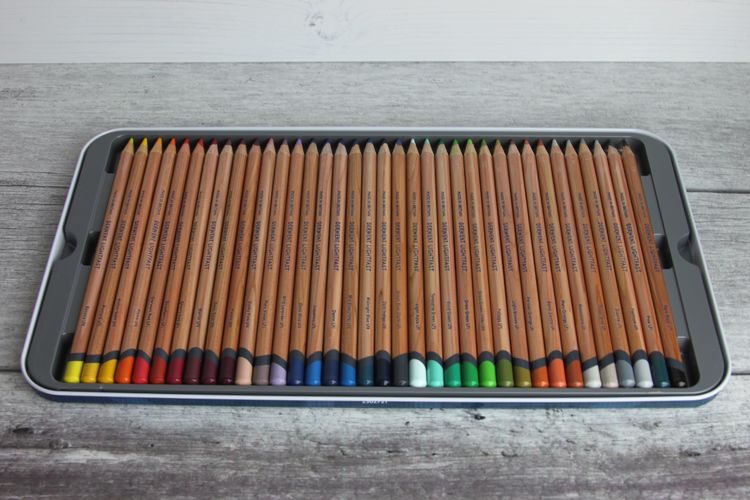
I think these pencils are amazing! They have definitely joined my favourite brands and I think they work very well with other pencils. They have a beautiful rich buttery consistency yet at the same time give the hardness for detail that I don’t necessarily have with some of my other brands. They have some beautiful colours within the set of 72 but I feel that there are some gaps. Some of these will be filled when the set of 100 are released. However, I do think it would have been helpful to have some lighter to mid tones of blue in there, as the set has quite a lot of mid to dark tones of blue and doesn’t seem balanced. There are 63 out of the 100 pencils with the highest lightfast rating which is brilliant and the rest with a lightfast rating of 2 which is still very good. I guess it depends what you are looking for! For me personally I will work with pencils with a rating of 1 or 2 so these fit the bill for me. They are on the higher end of the price scale per pencil, but for a decent lightfast rating, then I think they are worth it. Overall I love these pencils and I can’t wait to get the last 28 pencils to complete my set! If you have not used them, then I would definitely recommend purchasing a few individual pencils to see what you think.
Happy Drawing
Izzy x
If you would like to keep up to date with new blogs, news, top tips, promotions etc then sign up to my newsletter.
What the new set of 36 colours actually like?
What would the range of colours across the 72 be like?
How would they preform?
Would the new set of 36 be available as a tin of 36 without having to buy all 72?
I know they are called Lightfast, but how lightfast are they really?
In this blog, I shall be looking at all of these questions and giving my own opinions on them.
Are these new set of 36 pencils available as a separate set?
First of all the good news is that you are able to purchase these second set of 36 pencils in a separate tin or as individual pencils. Prices vary depending where you purchase them. On the Derwent’s own website, a tin of 36 is £109.99, a tin of 72 is £229.99, a wooden box of 48 is £169.99 and individual pencils retail at £3.20 each. If you shop around then there are some shops offering these at cheaper prices. For example, Cult Pens have a tin of 36 for £73.69 and a tin of 72 for £149. They also offer individual pencils for £3.20 but they currently have an offer on of 3 for 2. If you are just looking for individual pencils then I can personally recommend the lovely Emma Kerridge who runs the coloured pencil shop online. She offers individual Lightfast pencils at £2.90 each and gives any members of the UKCPS a 10% discount. I have always had an excellent service from her and never had any problems with pencil leads breaking with all the brands I have purchased from her.
First Impressions
The new tin is the same picture as the first set of 36 pencils. The only difference appears to be a sticker on it saying 36 new pencils. The picture on it is by the very talented Jessie Lane and shows what can be achieved with these pencils. I’ve got to say, I was so excited when these arrived and I couldn’t wait to open them and try them. First impressions were I liked the look of the new colours and could immediately spot a number of pencils that I thought would get used a lot in drawing animals which is what I mainly focus on.
So what colours are actually in this news set of 36?
Well, there is a couple of bright yellows (Banana and Mustard) and oranges (Amber Gold and Flame). Four new shades of reds ranging from the bright to the very dark (Derwent Red, Strawberry, Cherry Red and Merlot). There is only one new pink (Dusky Pink) and three shades of purple (Deep Rose, Purple and Wild Lavender). The new set is heavily weighted towards blue and green with seven new shades of blue that are mid to dark in shade (Deep Blue, Sapphire, Denim, Mid Blue 70%, Midnight Blue, Dark Indigo and Ocean Blue Dark), two turquoise colours (Light Aqua and Turquoise Green) and five new shades of green (Vivid Green, Pine, Grass Green, Grass Green (70%) and Foliage) that look very useful for foliage and landscapes. The new set also consists of a Light Bronze, three orange sienna colours (Persian Orange, Burnt Sienna and Mars Orange), four shades of grey (Fossil Grey, Moonstone, Granite and Platinum) and a Mars Black.
So how do these colours fit in with the first set of 36?
Well as you can see the range was in need of some more shades of yellow as the first set had one bright yellow (Sun Yellow) and one light creamy yellow (Champagne) The two new yellows (Banana and Mustard) are actually quite similar in colour when I tested them and although nice colours, I wish there was a shade between the Champagne and the brighter yellows. For example, in the Prismacolor range I like the Eggshell which is a muted yellow and I feel that this is missing from the current 72 pencils. Having looked at the Derwent Colour chart for all 100 pencils, it could be that the Gold could perhaps fill this role but it is difficult to tell from a tiny patch of colour on a computer scene, so I will have to wait and see!
The original set of 36 didn’t contain any oranges and so it was necessary for them to include some in this next set of 36. There is however only two shades, one is a yellowy orange and one more of a red orange. There are six other shades of yellow and orange due to be released in the set of 100, and I feel these are very much needed as currently this is the area lacking the most in terms of choice. I am particularly looking forward to trying out the Golden Sun, Apricot and Dark Honey which are orangey yellow in tone and I think could be very useful for drawing tigers.
For the subjects I tend to draw, I don’t use a lot of reds but I can see that the new shades were very much needed as there was previously only one available. I can see how they would be very useful for drawing flowers and fruits etc. For me personally, I can see that the new dark red Merlot would be the most useful, but I would have liked to have seen another shade of dark red to go alongside this.
The current range of pinks are either pale or muted in tone. I have to say I do like their tones but currently they are missing a bright pink which I would want to include in my set which I think the Magenta from the set of 100 includes.
One of the things I particularly liked about the first set of 36 pencils was the range of purples and this has been made even better with their new additions. While I like a couple of shades of purple from other brands of pencil that have good lightfast ratings, I felt that this was something lacking in my palette to an extent. I am very pleased to have these new colours to play with but the Violet, Blue Violet and Nightshade from set 1 are still my favourites!
As I mentioned before, this set is heavy on the blue. It needed to be as there were only two available in the first set of very pale (Artic) and a bright mid tone blue (Mid Ultramarine) which I have to say I have used both quite a lot. In this second set, there is more emphasis on mid to very dark blue tones which could be useful for water. However, I would have liked to see a couple more shades of light to mid tone blues for skies. I feel there is quite a jump from the Mid Ultramarine to the next shades.
I was very excited to see the Light Aqua and Turquoise Green. What beautiful shades of colours! I now just need to find something to draw where I can really test them out!
This set of 36 contains some great looking shades of green that would be useful for landscapes. The first set had three very dark greens that are very similar in colour. The addition of these new shades has really given more variety and there are still five more shades of green to come in the set of 100. I shall be very interested to test these out.
I like the addition of the three orange browns (Persian Orange, Burnt Sienna and Mars Orange) I shall personally be testing these out when I next draw a tiger! There are some lovely shades of brown across the 72 pencils. The colour that is missing for me looks similar to the Autumn Brown which is part of the 100 set.
The four new shades of grey released in this set were needed to increase the range and there are some lovely shades. For me they could do with adding a couple of darker greys.
What I do like about these pencils is the fact that there are three shades of black. I really like the new Mars Black which has a browny purple hue to it.
Overall, I think these new set of 36 pencils really extend the range and fill in most of the gaps that were in the first set.
What are my favourite colours?
Those colours that you use the most in your work really come down to personal choice and what subject matter you draw. For me though, I have developed some firm favourites from the first 36 pencils and I can definitely see I will be adding to that list with these next set. From the first set of 36, I have been using Violet, Blue Violet and Nightshade an awful lot. I have found them to be brilliant in layering to create a good deep black along with blues and browns. I also really like the Mid Ultramarine, and find this a great fresh light blue. The other three colours I particularly like to use when drawing animals have been the Yellow Ochre, Wheat and Sandstone. From the new set of 36 pencils, I can already see that the Fossil Grey, Moonstone, Dusky Pink, Mars Violet, Persian Orange, Burnt Sienna and Mars Orange will be very useful for drawing animals.
What are they actually like to use?
So onto the exciting part of testing them out. When trying out pencils and testing them and what the colours are like, I like to do so on the type of paper I’m drawing on to see how they perform. I also like to see what they are like with different pressures so I do a graduated scale. I have done this on quite large rectangles, mainly so I can share the colours with you clearly. You are welcome to download this template here if you would like to use it.
Downloadable Derwent Lightfast Pencils Blank Colour Chart
If you want to create smaller charts, then just print them out at 2 or 4 to a page to suit your needs. I have included all 100 colours on my chart ready for when the next pencils become available hence the blank spaces.
Firstly in terms of what they look like and feel like to hold. I personally really like the shape of the round barrel and I like the fact they are wider. I also like the wooden barrels with the colour at the ends. This is really useful if you have them stored upright. If you are someone who stores their pencils in pots with the points sticking up then this is not very helpful. The names of the pencils are written in black on the sides which is easy to read. I have found on a couple of my pencils that the name has unfortunately rubbed away, but I can still read what it says.
I have personally always preferred using what is referred to as wax based pencils over oil based. However, these pencils have fitted into my collection amazingly and they work really well with my other brands. They have made me look at oil based coloured pencils with a change of heart. What I like about them is that there are very creamy and buttery to apply, yet they are fairly hard which is good for details as well as blocks of colour. They are great for applying light layers and then blending with more pressure in the final layers. I did find though that the lightest colours seem harder than some of the darker colours. Also I found some of the lighter colours such as the Flesh Pink quite scratchy in comparison to the darker colours. I’m not entirely sure why, but the Dusky Pink had some grey in it when I did my tester square. I’ve never had this happen before and I’m not sure if it was something that got stuck to the lead when sharpening or if it was in the lead. It will definitely make me double check my pencils before using them though. Overall in terms of what they feel like to use I think Derwent have struck a winning balance.
How Lightfast are they?
Now these pencils might be called Lightfast, but I wanted to find out just how Lightfast they actually are! The information I have found out is taken directly from the Derwent Website. Derwent say;
'The revolutionary core is resistant to prolonged colour change ensuring artwork will not fade for up to 100 years under museum conditions.’
'Many people equate lightfastness with permanence.This is not strictly accurate as many other factors can affect the permanence of your work such as humidity, temperature, atmospheric pollution, reactions between different pigments and chemicals, the paper you use, and even the way you use your art materials.
For optimum performance of your pencils follow these simple guidelines:
1. Use high quality pH neutral heavy weight paper
2. Create strong, even layers and avoid damaging the substrate
3. Do not hang or exhibit your work in direct sunlight
4. Mount your work behind glass, preferably with an ultra violet absorbing coating
5. Remember that the lightfastness of Derwent Lightfast may be adversely affected if mixed with other products’
The Lightfast pencils have had two types of testing ASTM D6901 and ISO 105. I wanted to look a little more into what this actually means. The ASTM D6901 is the international standard for lightfast testing. According to the Coloured Pencil Society of America;
‘D6901 uses two types of lightfast testing, a sunlight test and a xenon arc test, to simulate the effects that prolonged sun exposure will have on a colored pencil. With the results of these tests, a colored pencil can then be accurately placed into a lightfastness category. Lightfastness categories are I, II, III, IV, and V with I being the best (very lightfast) and V being the worst (fugitive/not lightfast). Only pencils with lightfastness ratings of either I or II can be labeled as complying with the standard. For an entire line of colored pencils to be labeled as D6901 compliant, every pencil must have a lightfast rating of either I or II.’
The ISO 105 testing is measured on the Blue Wool Rating scale where the numbers work in the opposite direction. So 1-3 poor, 4-5 fair, 6 is good, 7 is very good and 8 are excellent. I can only find a broken down chart of these results for the first 36 pencils. Of which most where classed as excellent, 5 as very good and there were two classed as good. However all of these first 36 pencils received a I on the D6901 standard tests which is a little confusing!
So what does all this actually mean?! Having looked at the Derwent colour chart, they have classified all 100 of these pencils as either a 1 or 2. There appears to be 63 pencils classified as a 1 and 37 classified as a 2. All of the first set of 36 pencils have a rating of Lightfast 1 and in the new set of 36 pencils, 21 have a lightfast rating of 1 and 15 pencils have a lightfast rating of 2.
From what I understand a lightfast rating of 1 is excellent and under museum conditions as mentioned above is over 100 years. A lightfast rating of 2 is very good and under museum conditions is 50-100 years.
Overall conclusions
I think these pencils are amazing! They have definitely joined my favourite brands and I think they work very well with other pencils. They have a beautiful rich buttery consistency yet at the same time give the hardness for detail that I don’t necessarily have with some of my other brands. They have some beautiful colours within the set of 72 but I feel that there are some gaps. Some of these will be filled when the set of 100 are released. However, I do think it would have been helpful to have some lighter to mid tones of blue in there, as the set has quite a lot of mid to dark tones of blue and doesn’t seem balanced. There are 63 out of the 100 pencils with the highest lightfast rating which is brilliant and the rest with a lightfast rating of 2 which is still very good. I guess it depends what you are looking for! For me personally I will work with pencils with a rating of 1 or 2 so these fit the bill for me. They are on the higher end of the price scale per pencil, but for a decent lightfast rating, then I think they are worth it. Overall I love these pencils and I can’t wait to get the last 28 pencils to complete my set! If you have not used them, then I would definitely recommend purchasing a few individual pencils to see what you think.
Happy Drawing
Izzy x
If you would like to keep up to date with new blogs, news, top tips, promotions etc then sign up to my newsletter.
Comments (click to expand)